前言
继上次的 (水)文:在 Azure vm 创建 Oracle 数据库 , 后来发现 dbca (Database Configuration Assistant) 只是个配置助手,用来创建 Oracle 数据库,我还没有真正安装过 Oracle 数据库,今天就来尝试下。
先总结一下:回过头来看,CentOS 是安装 Oracle Database 最省事的发行版。
Azure 已经开不起了,全部开成梯子了
所以我选择在吃灰的 PVE(proxmox) 上开个 Linux 小鸡。
为了完成本文,我把小鸡删了重新创建,一步一步记录,确保没有留下任何坑。
创建 CentOS 7 虚拟机
ssh 到 PVE 宿主机上,下载 CentOS 7 镜像。
镜像下载地址:http://isoredirect.centos.org/centos/7/isos/x86_64/CentOS-7-x86_64-DVD-1804.iso
iso存放位置:/var/lib/vz/template/iso/
因为以下原因,上方镜像下载地址已失效,你可以访问 https://www.centos.org/download/mirrors/ 查找离你服务器近的镜像地址
In order to conserve the limited bandwidth available, ISO images are not downloadable from mirror.centos.org
我这里使用的镜像地址:
http://mirror.sesp.northwestern.edu/centos/7.8.2003/isos/x86_64/
1 | # iso 镜像存放位置 |
有了系统镜像,我们就可以到 PVE web 管理界面创建虚拟机了。
创建虚拟机的详细过程可以参考: 如何在proxmox上创建一个KVM的虚拟机模版
我的配置:
- Disk 100G
- CPU 4 Cores
- RAM 8192 MiB
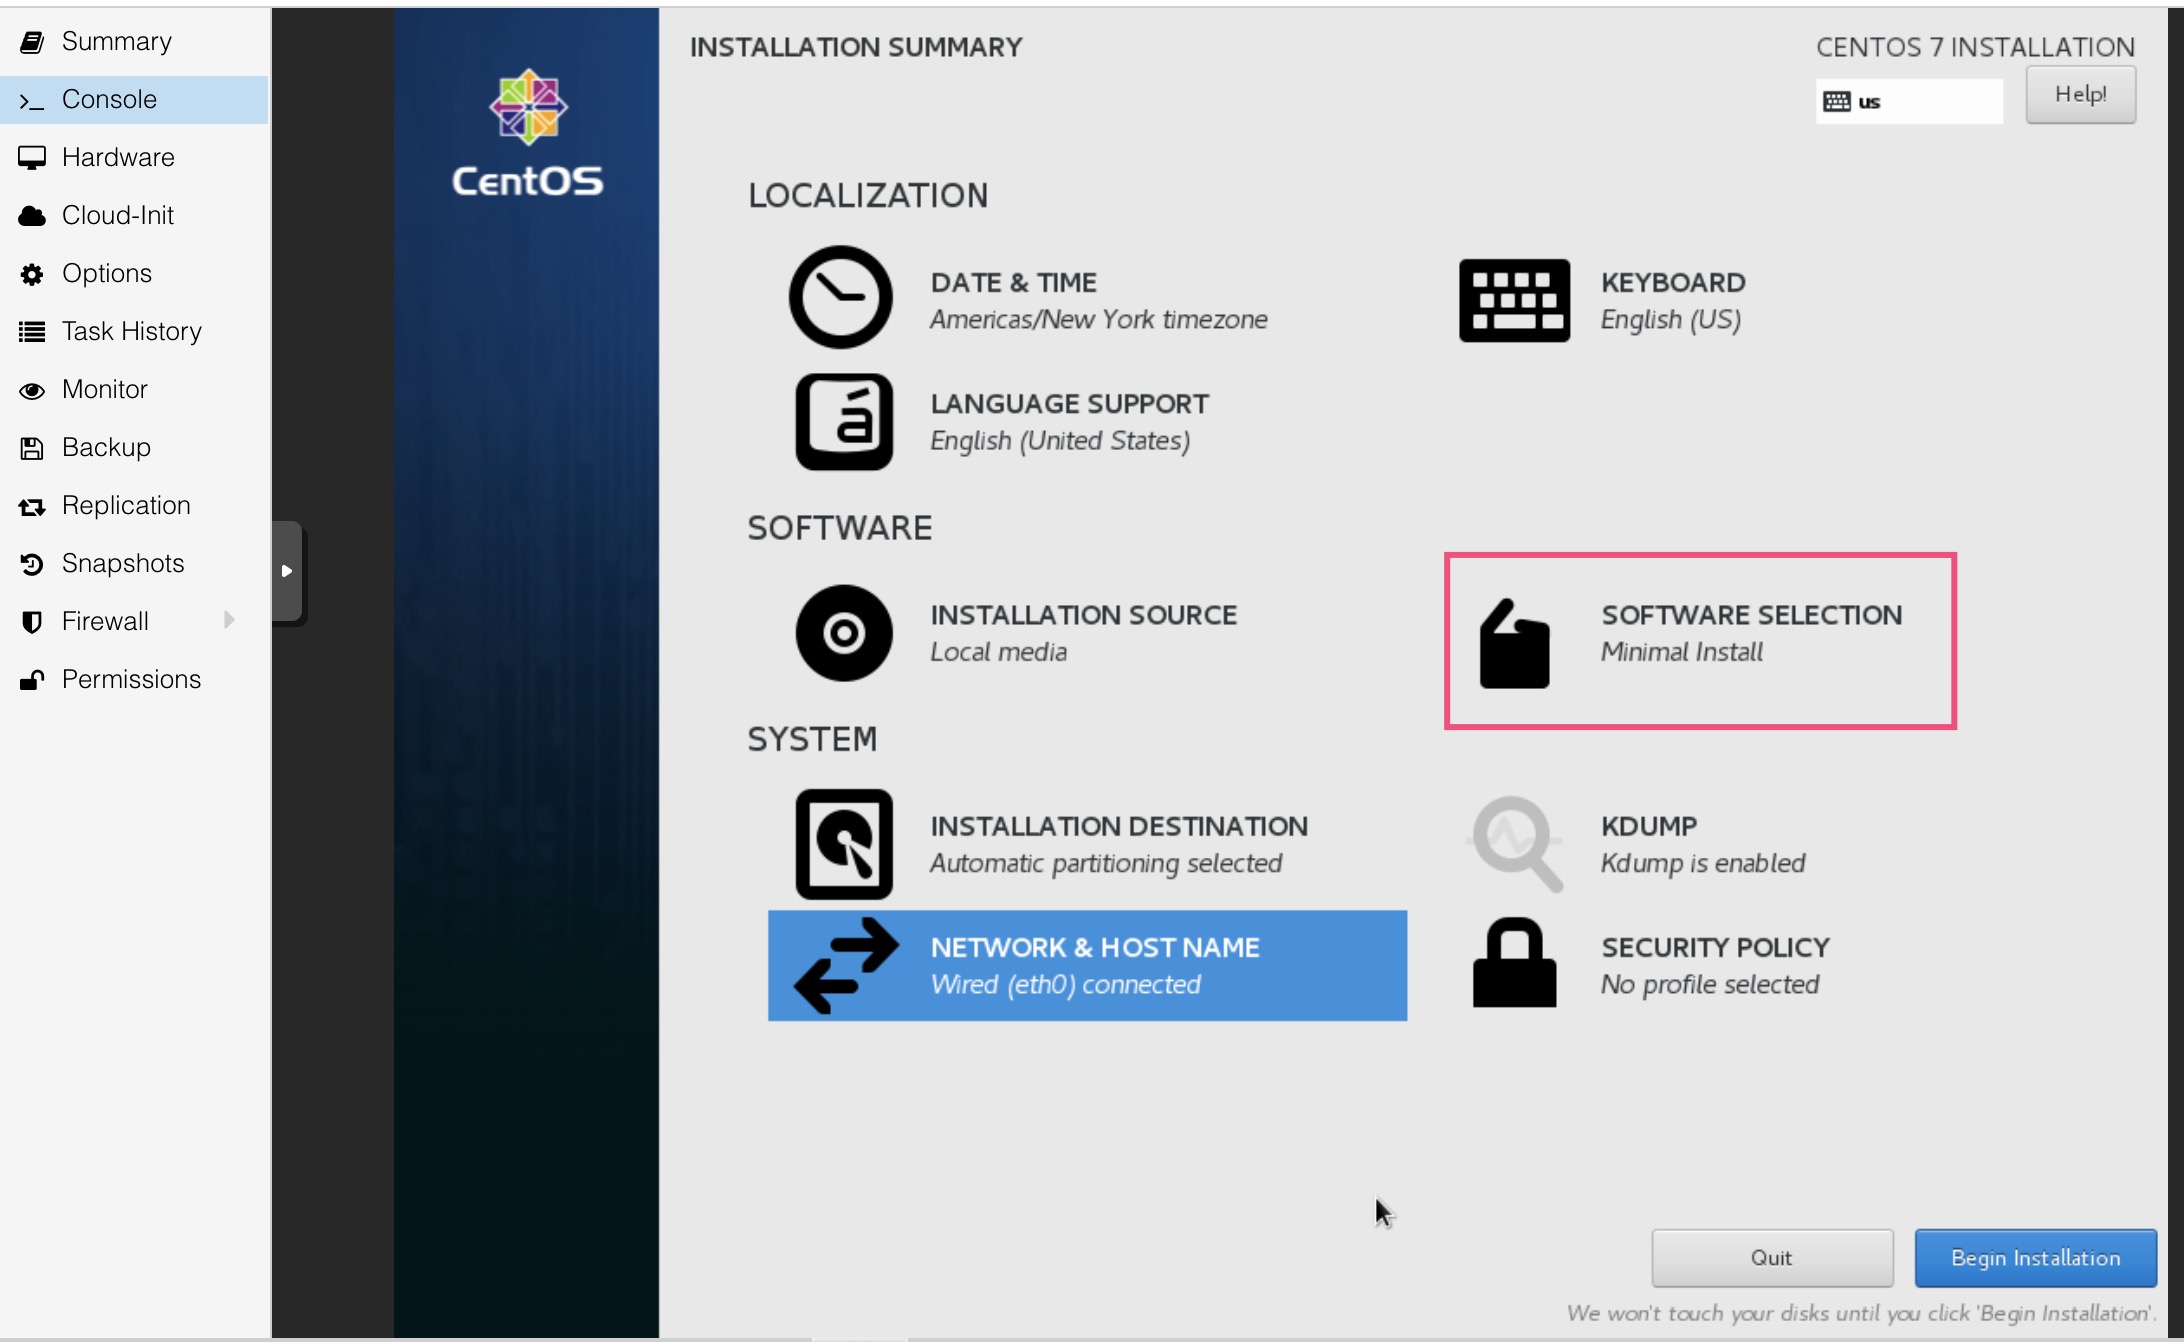
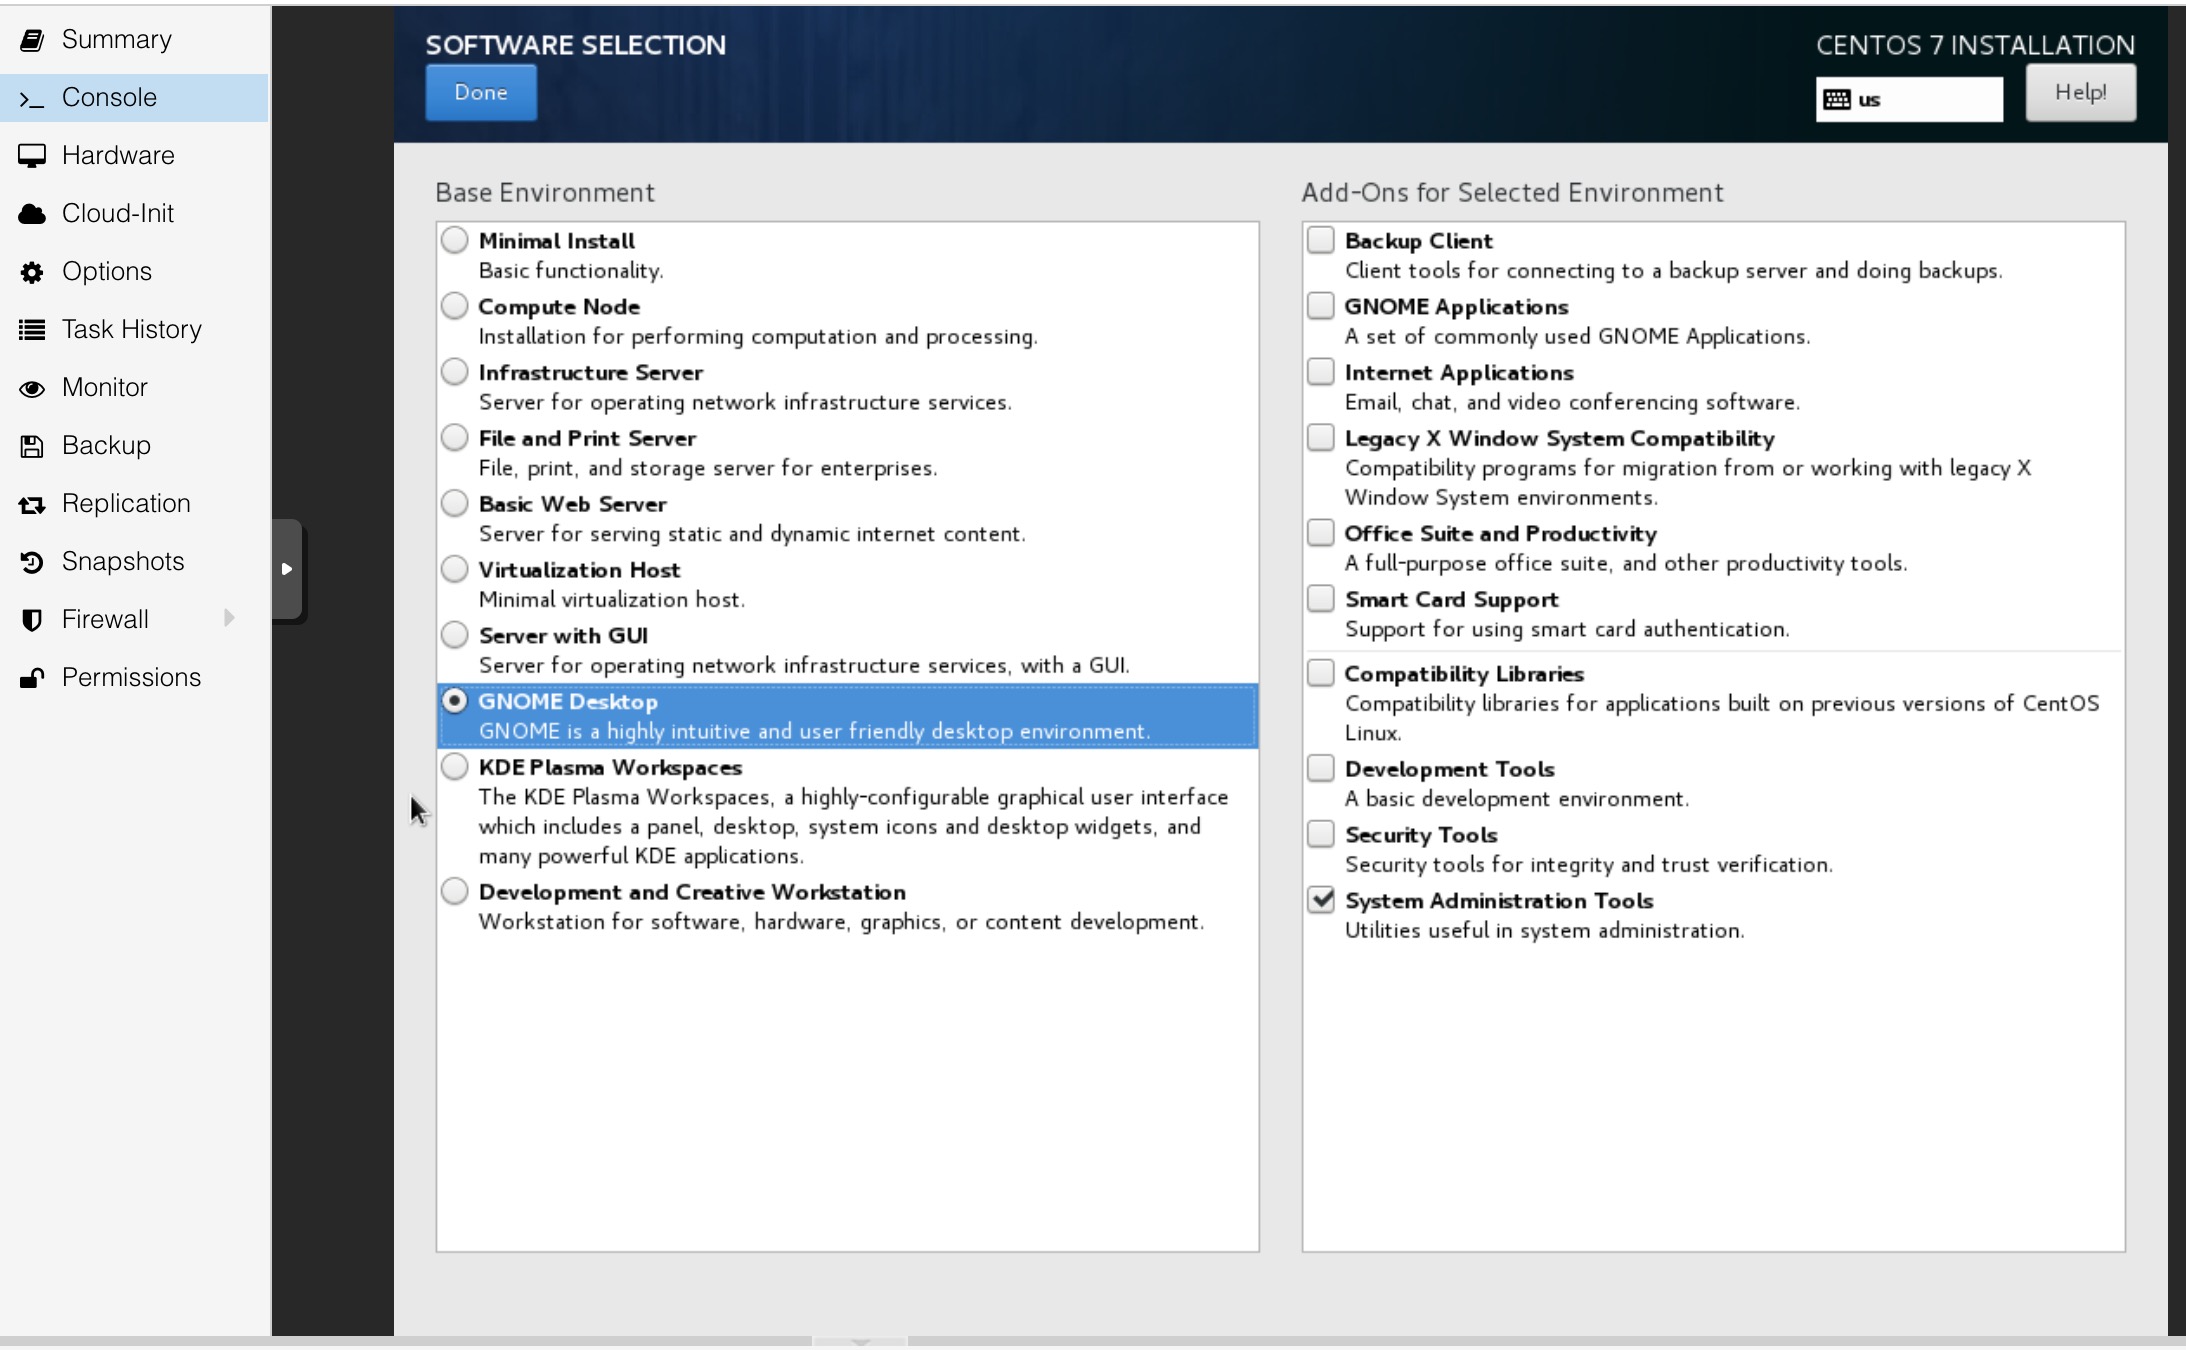
在进行 CentOS 安装时,我选择了安装 GNOME 桌面。之前安装时不知道,在 Ubuntu 上尝试安装 Oracle Database,配置完准备工作,准备安装 Oracle 时,才发现需要 GUI,只能现装了个 GNOME,当然,后来因为奇怪的错误,失败了,所以换到了 CentOS。
安装 Oracle Database
参考:
- https://www.nakivo.com/blog/how-to-install-oracle-on-ubuntu-linux-waltkhrough/ ( 别看是 11g 和 ubuntu 的,安装过程大同小异)
- https://www.supportsages.com/installing-oracle-11g-release-2-in-centos-7/
当然以上两篇只是参考,不用全部照搬执行。
像这,server.example.com不用配置。
配置 Oracle 环境
ps: 因为这台服务器在美西,国内访问比较龟速,刚好前段时间 Cloudflare 为付费用户开放了 Spectrum 服务,我有个域名是 Servershield Pro 接入的,就给这台 CentOS 分配了个 Spectrum ssh 服务,ssh 连接质量比原来好了很多。
- 创建用户和用户组
创建 Oracle Inventory 用户组1
groupadd oinstall
创建 Oracle DBA 用户组1
groupadd dba
为 Oracle 用户创建家目录:1
mkdir /home/oracle/
创建 Oracle 安装目录:1
2mkdir -p /u01/app/oracle
mkdir /u01/app/oraInventory
将 oracle 用户添加到 dba 用户组,/home/oracle/ 作为家目录,/bin/bash 作为默认的shell :1
useradd -g oinstall -G dba -d /home/oracle -s /bin/bash oracle
为 oracle 用户设置密码:1
passwd oracle
更改 Oracle 用户家目录和安装目录的所有者为 oracle 用户,属组为 oinstall
因为现在是用 root 用户创建的,目录的所有者和属组都是 root。1
2
3chown -R oracle:oinstall /home/oracle
chown -R oracle:oinstall /u01/app/oracle
chown -R oracle:oinstall /u01/app/oraInventory
- 配置内核参数
vim /etc/sysctl.conf1
2
3
4
5
6
7
8
9
10
11
12
13
14
15
16
17
18
19
20
21
22
23
24
25
26
27
28
29# ============================
# Oracle 11g
# ============================
# semaphores: semmsl, semmns, semopm, semmni
kernel.sem = 250 32000 100 128
kernel.shmall = 2097152
kernel.shmmni = 4096
# Replace kernel.shmmax with the half of your memory size in bytes
# if lower than 4 GB minus 1
# 2147483648 is 2 GigaBytes (4 GB of RAM / 2)
kernel.shmmax=2147483648
#
# Max number of network connections. Use sysctl -a | grep ip_local_port_range to check.
net.ipv4.ip_local_port_range = 9000 65500
#
net.core.rmem_default = 262144
net.core.rmem_max = 4194304
net.core.wmem_default = 262144
net.core.wmem_max = 1048576
#
# The maximum allowed value, set to avoid overhead and input/output errors
fs.aio-max-nr = 1048576
# 512 * Processes
fs.file-max = 6815744
fs.suid_dumpable = 1
#
# To allow dba to allocate hugetlbfs pages
# 1001 is your oinstall group, you can check this id with the grep oinstall /etc/group command
vm.hugetlb_shm_group = 1001
使更改生效1
sysctl -p
- 配置 shell 参数
编辑 /etc/security/limits.conf 文件:1
vim /etc/security/limits.conf
将以下行加入到配置文件的末尾:1
2
3
4
5
6# Oracle
oracle soft nproc 2047
oracle hard nproc 16384
oracle soft nofile 1024
oracle hard nofile 65536
oracle soft stack 10240
- 关闭 selinux
1
2[root@server ~]# vim /etc/selinux/config
SELINUX=permissive
修改完后重启服务器
关闭防火墙
1
2
[root@server ~]# systemctl stop firewalld
[root@server ~]# systemctl disable firewalld用户环境变量
切换到 oracle 用户
vim ~/.bashrc
1 | TMP=/tmp; export TMP |
安装程序会读取这些环境变量。
- 安装依赖
如果你使用的是 Oracle Linux,可以参考 https://blogs.oracle.com/linux/oracle-database-12c-preinstall-steps-for-oracle-linux-simplified 的方式安装依赖
如果是 CentOS,那就复制以下
为什么是这些包,而不是其他的?
后面安装包会检测依赖,如果你跳过此步骤,你就会看到需要安装的依赖有哪些了1
2
3
4
5
6
7
8
9
10
11
12
13
14
15
16
17
18
19
20
21
22
23
24
25
26
27
28
29
30
31
32
33
34
35
36
37
38
39yum install binutils -y
yum install compat-libstdc++-33 -y
yum install compat-libstdc++-33.i686 -y
yum install compat-libcap1 -y
yum install gcc -y
yum install gcc-c++ -y
yum install glibc -y
yum install glibc.i686 -y
yum install glibc-devel -y
yum install glibc-devel.i686 -y
yum install ksh -y
yum install libgcc -y
yum install libgcc.i686 -y
yum install libstdc++ -y
yum install libstdc++.i686 -y
yum install libstdc++-devel -y
yum install libstdc++-devel.i686 -y
yum install libaio -y
yum install libaio.i686 -y
yum install libaio-devel -y
yum install libaio-devel.i686 -y
yum install libXext -y
yum install libXext.i686 -y
yum install libXtst -y
yum install libXtst.i686 -y
yum install libX11 -y
yum install libX11.i686 -y
yum install libXau -y
yum install libXau.i686 -y
yum install libxcb -y
yum install libxcb.i686 -y
yum install libXi -y
yum install libXi.i686 -y
yum install make -y
yum install sysstat -y
yum install unixODBC -y
yum install unixODBC-devel -y
yum install zlib-devel -y
yum install elfutils-libelf-devel -y
下载 Oracle 安装包
11g 下载连接:https://www.oracle.com/database/technologies/112010-linx8664soft.html
12c 下载连接:https://www.oracle.com/database/technologies/oracle12c-linux-12201-downloads.html
其实在此之前,我还尝试过 Oracle 11g,但是安装时报错了:1
INFO: /lib64/libstdc++.so.5: undefined reference to `memcpy@GLIBC_2.14'
从 oracle 论坛的讨论 来看,11gR2 不支持 Linux 7,只能安装 12cR2,如果非得要 11gR2,只能在 Linux 5 或 Linux 6 上安装。
下载也有点小技巧。
只要是在 oracle 网站下什么安装包,需要登录账号并同意协议,没办法简洁的用命令下载。我的办法是,在 PC 上登录账号同意协议,打开 F12 监听请求,点击下载,然后取消,将最后一条请求,copy as curl,整个带着一大堆 cookie 和 header,复制到服务器的 shell,最后别忘了加上输出 -o oracle12c.zip。
解压1
unzip oracle12c.zip
所有文件会被解压到当前目录的 database 目录中。
进行安装
此时需要图形界面,到 PVE console 处(或者 VNC 连接图形化)。
打开一个 shell,进入上一步的 database 目录:1
./runInstaller
安装可以参考:https://www.nakivo.com/blog/how-to-install-oracle-on-ubuntu-linux-waltkhrough/#
备份连接:https://archive.is/SaMXN#selection-5438.0-5438.1
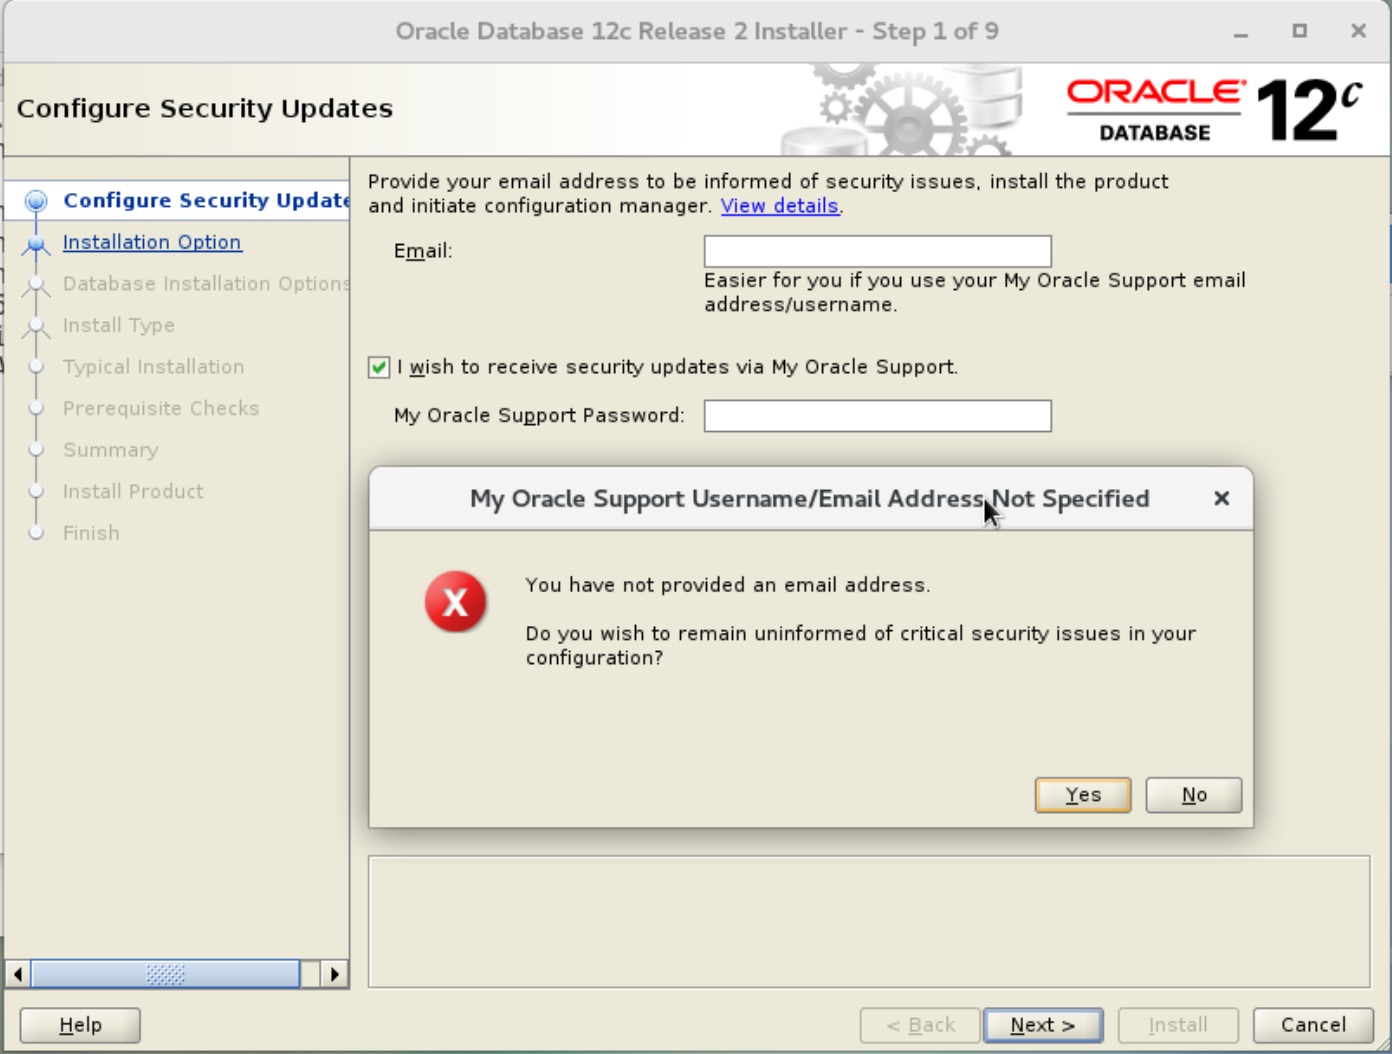
- Configure Security Updates 配置安全更新
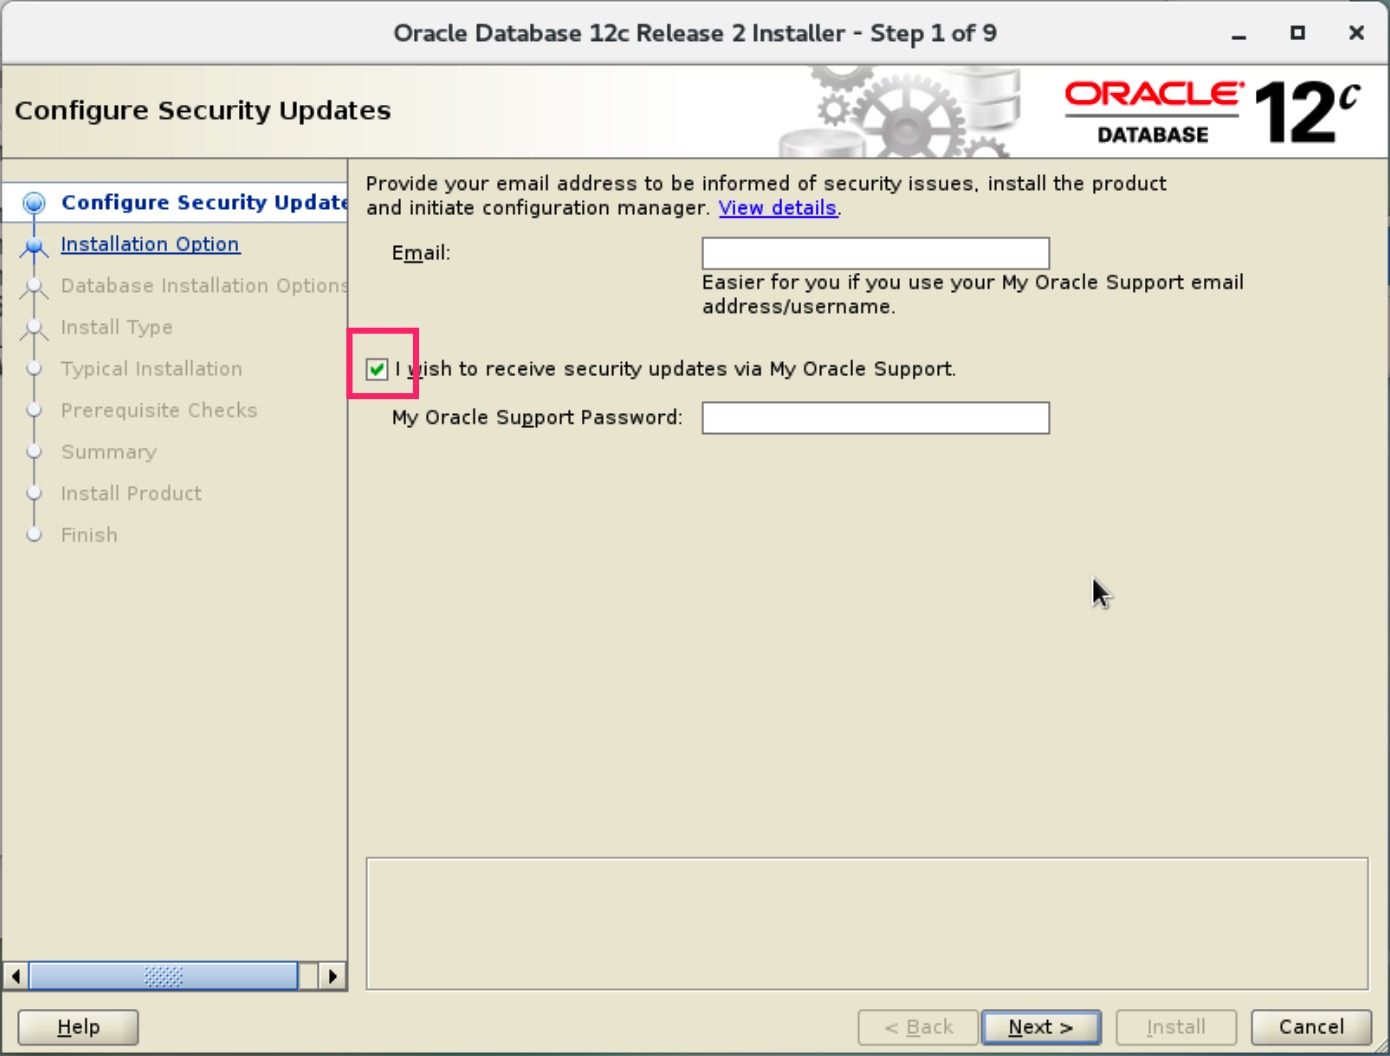
勾选不填,点下一步
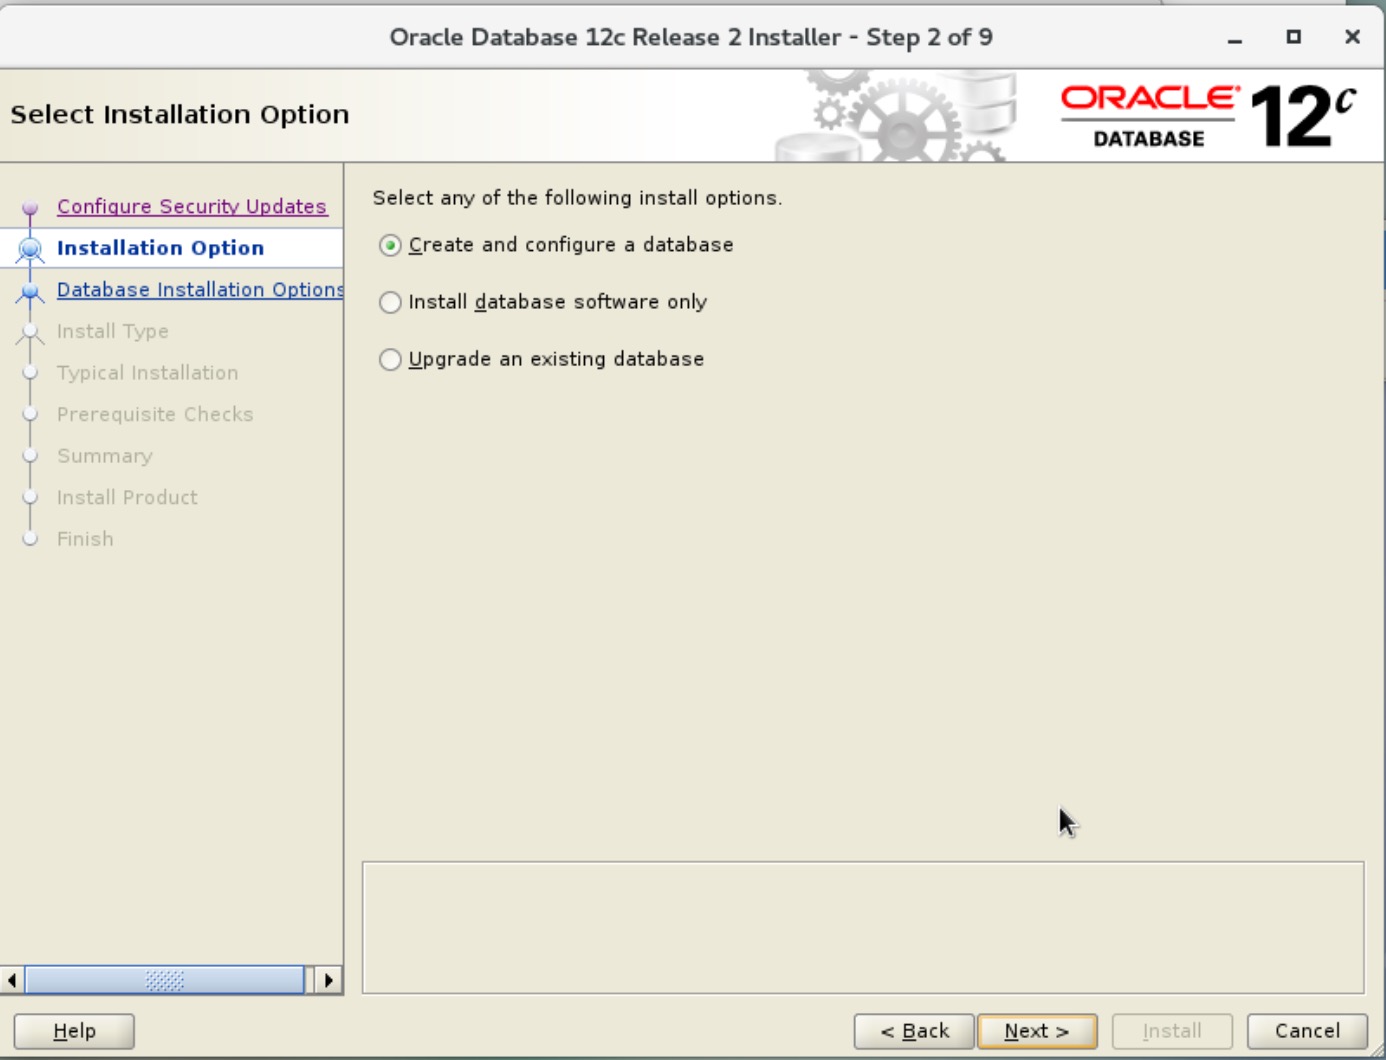
- 选择安装的配置
Create and configure a database.
- 系统类别
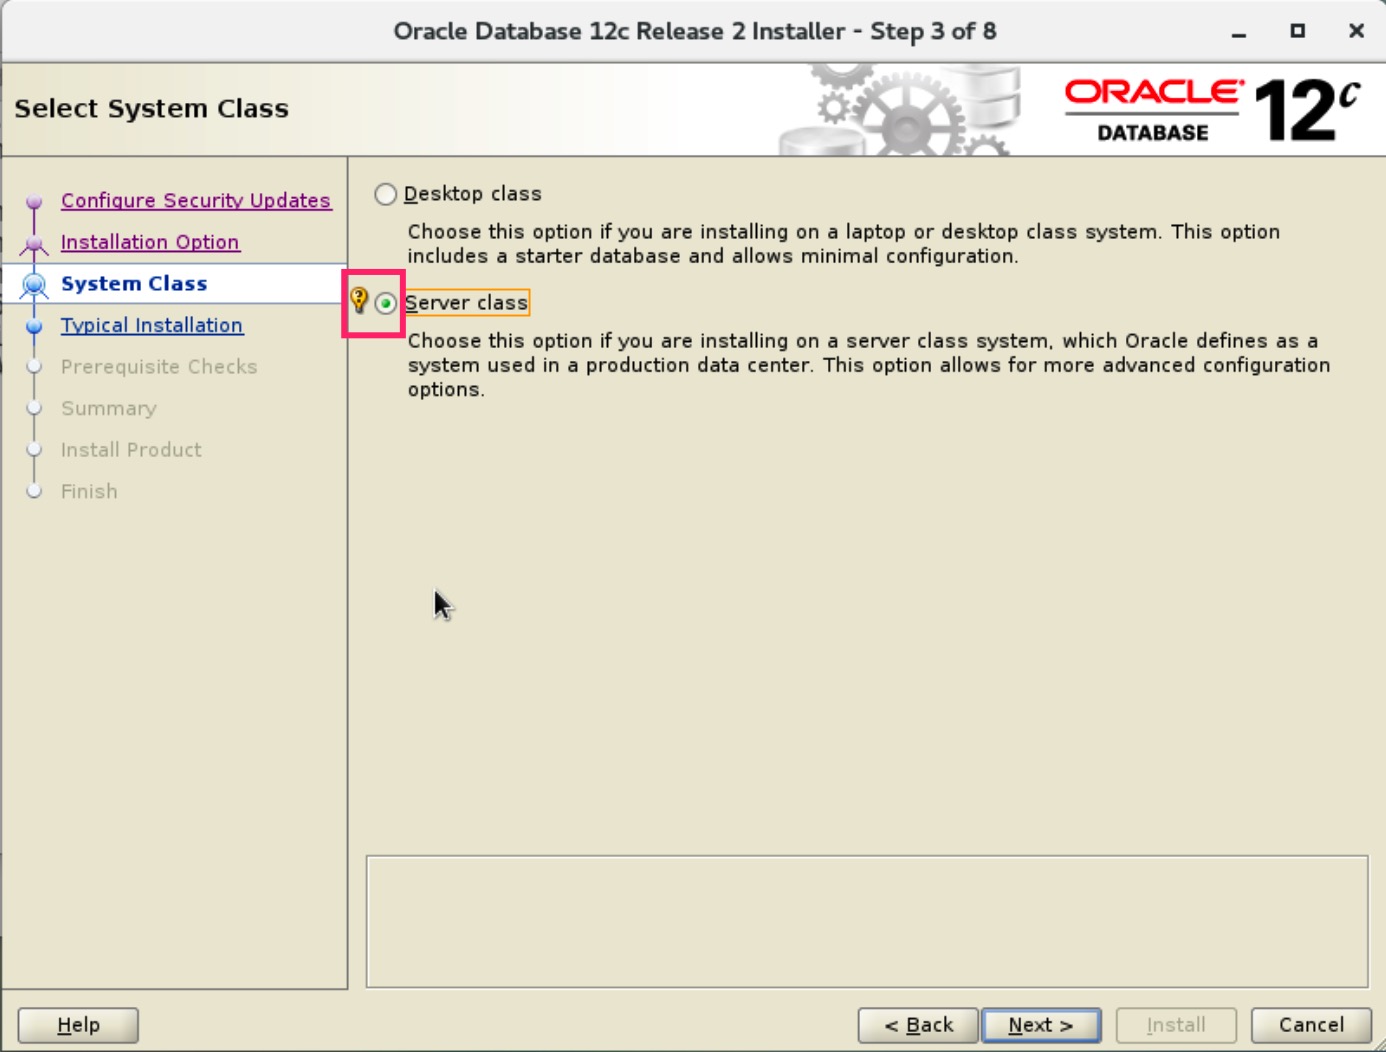
Server Class
- 单台实例

Single instance database installation
- 安装类型
高级安装
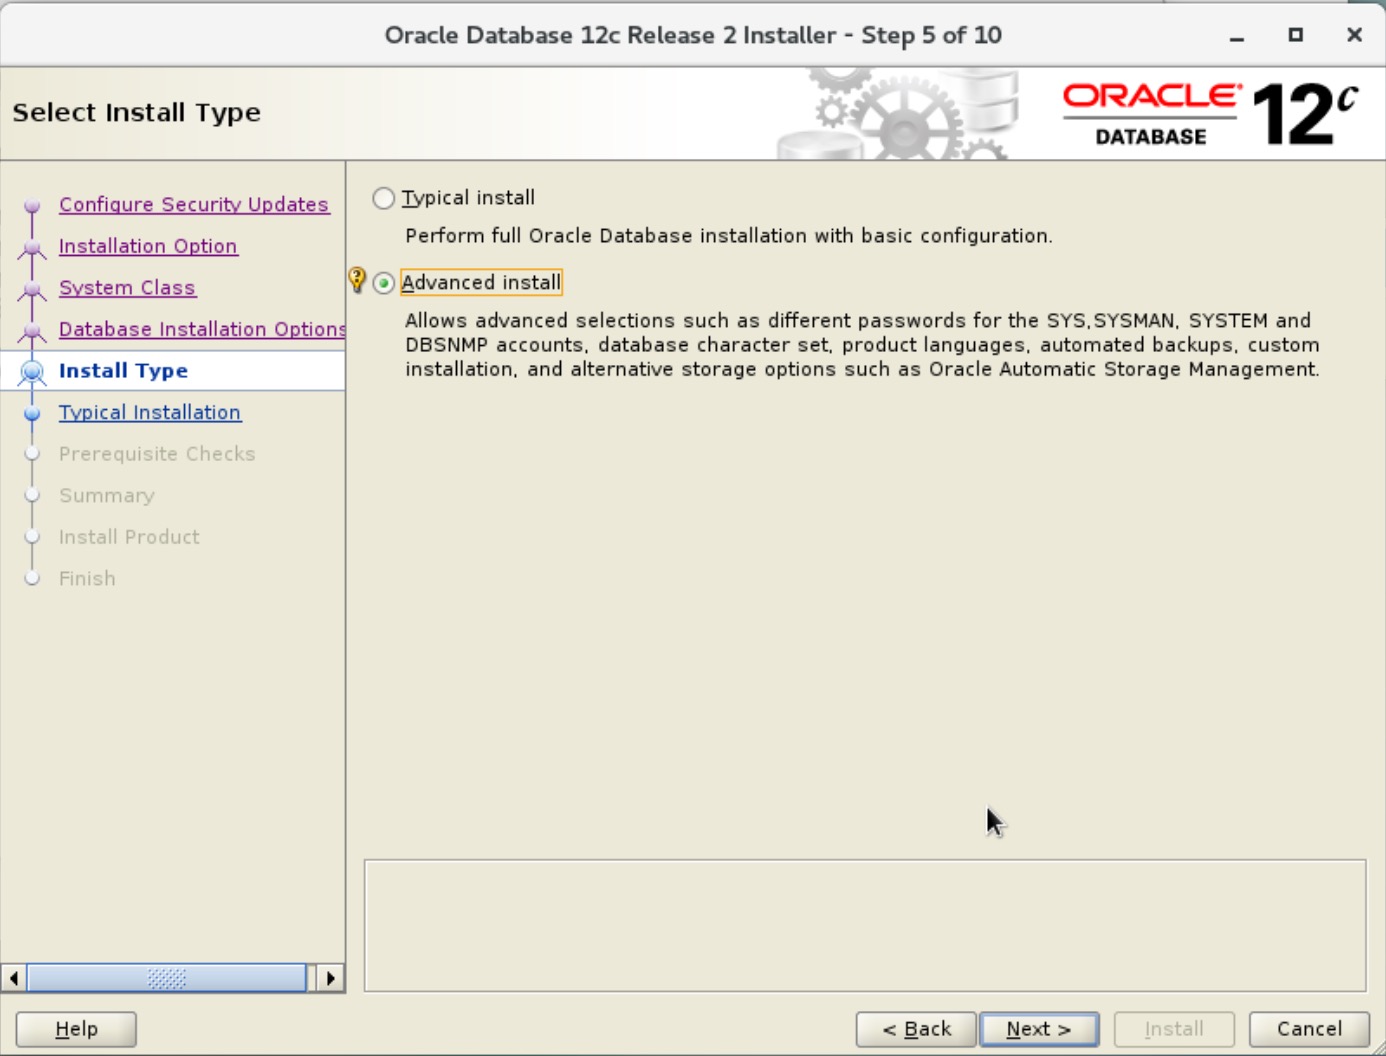
Advanced install
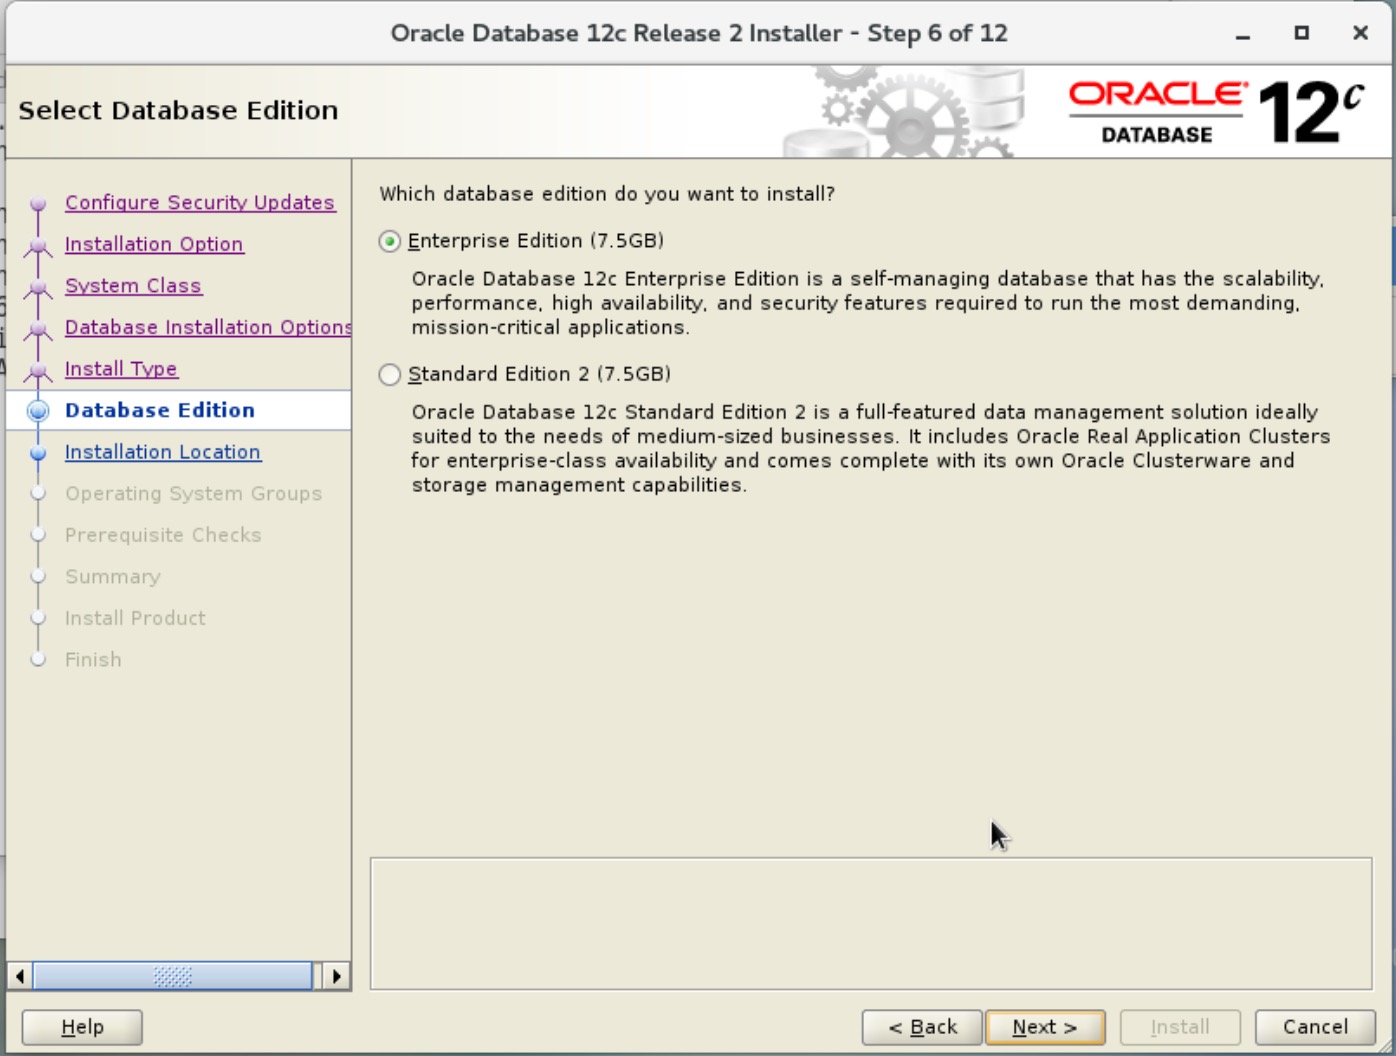
- 选择安装的数据版本
Database Edition:Enterprise Edition
企业版 或者 标准版
- Oracle 安装目录
Oracle Base: /u01/app/oracle
Software location: /u01/app/oracle/product/12.1.0/db_1
这里就是读取的环境变量了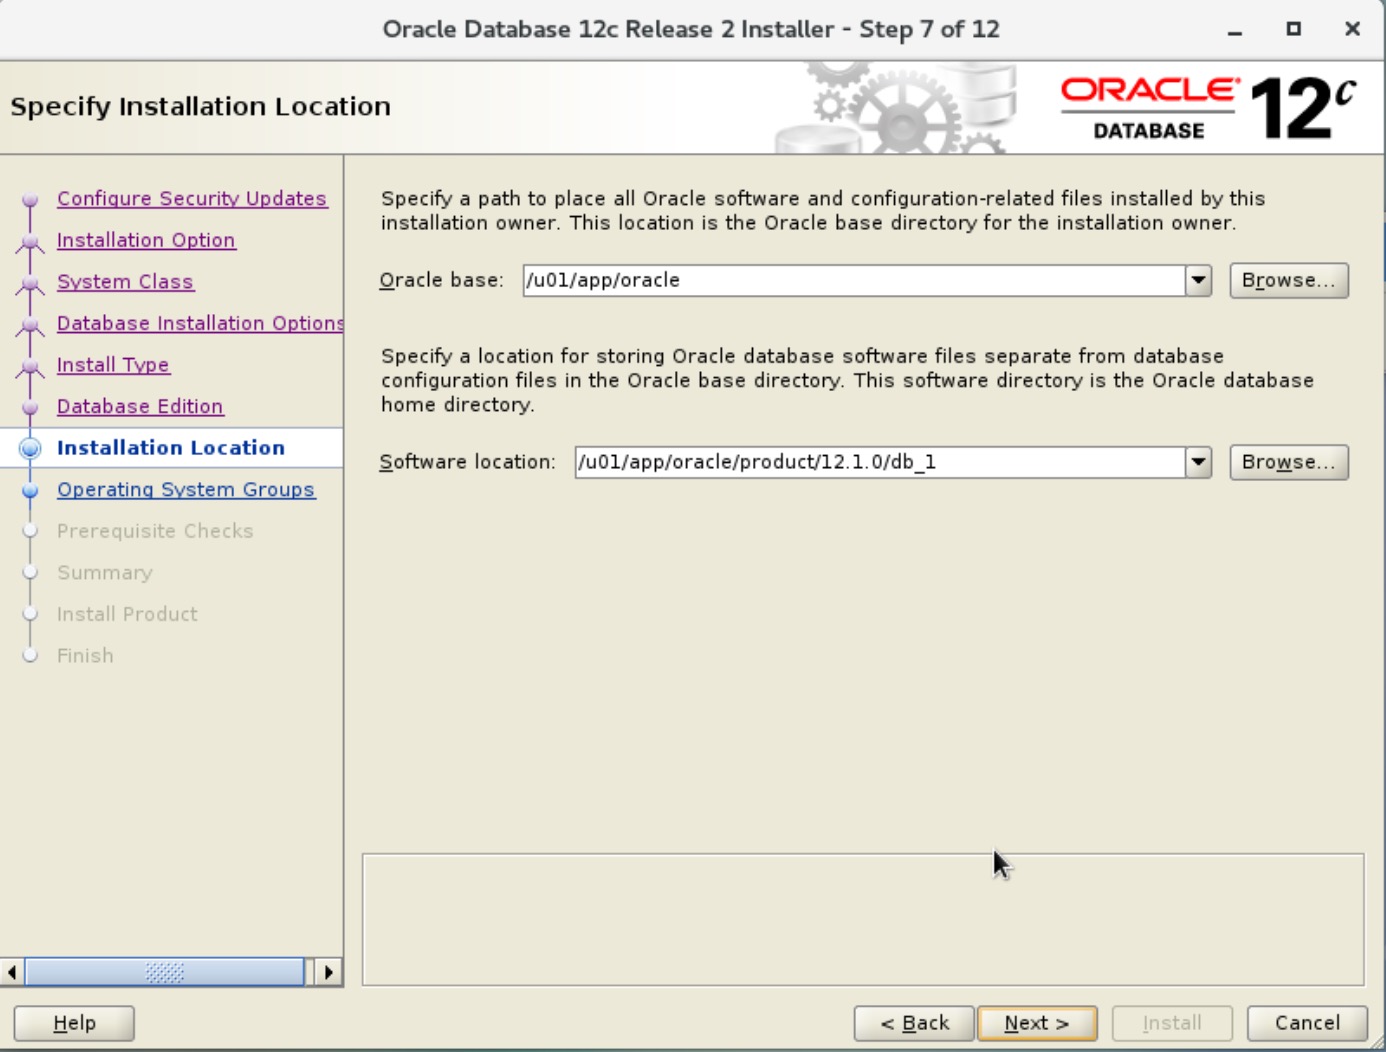
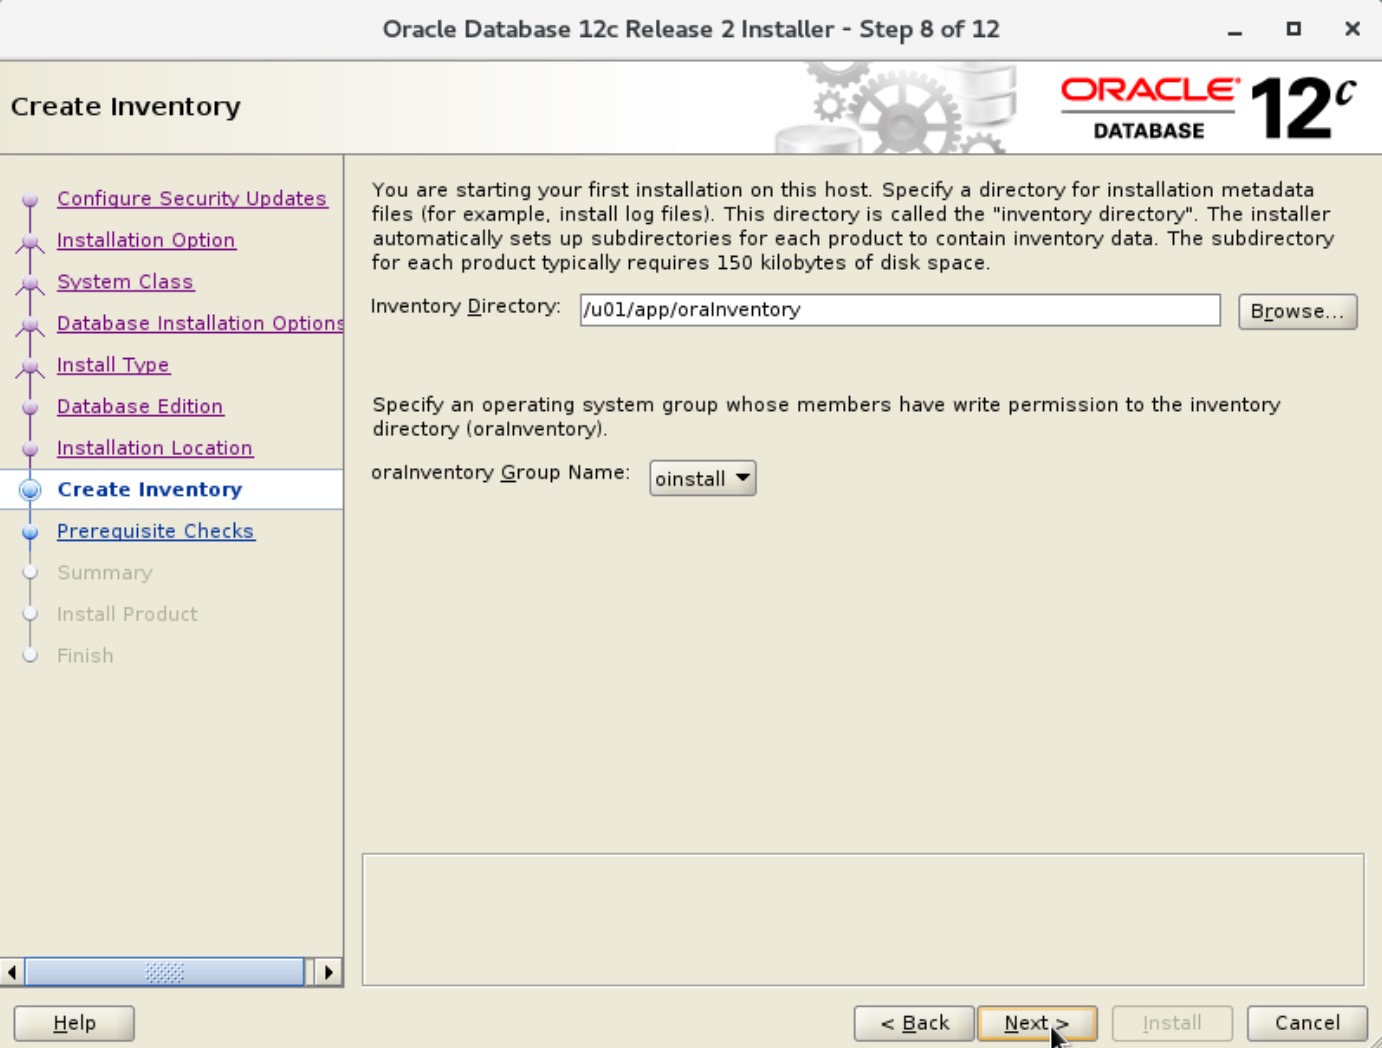
- Inventory 目录
Inventory Directory: /u01/app/oraInventory
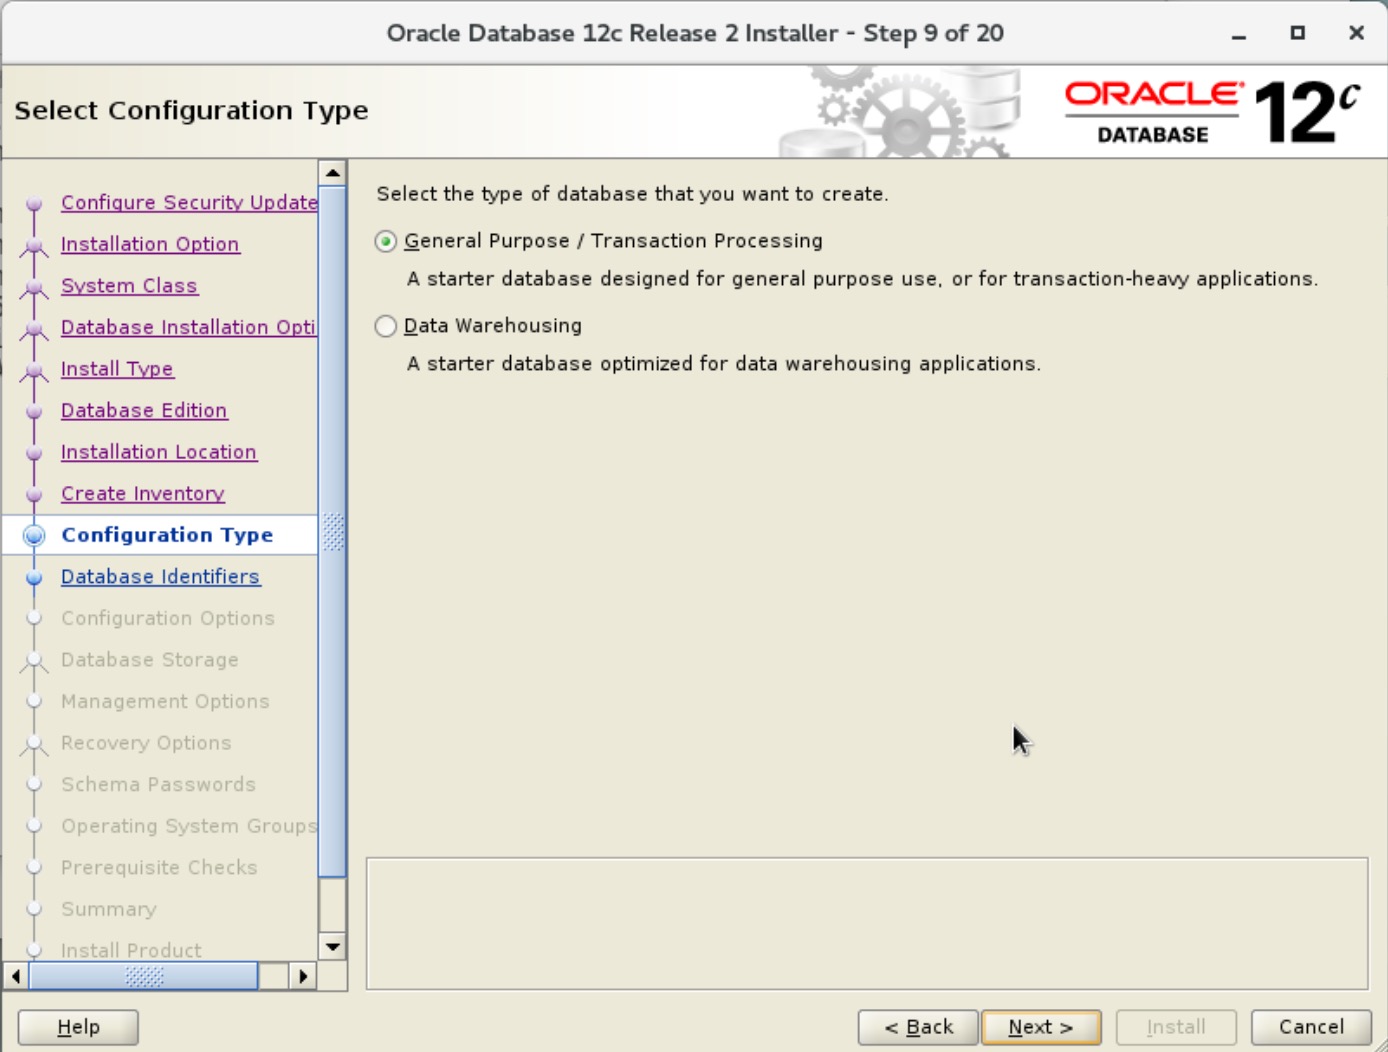
- 数据库的用途
- 常规用途 / 事务处理
- 数据存储
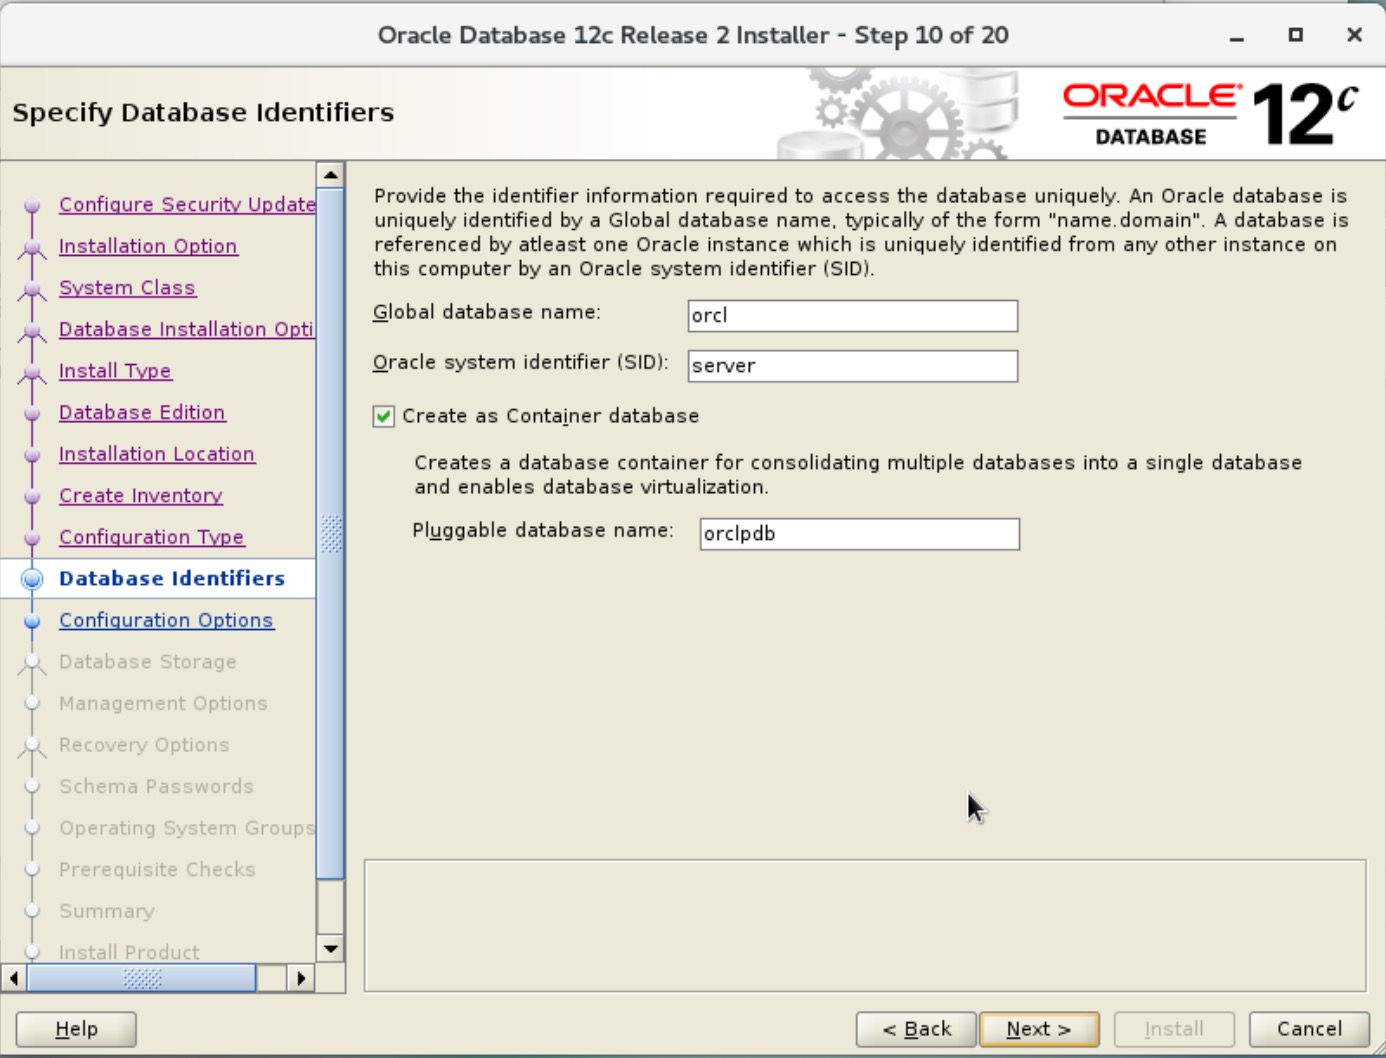
- 数据库名和 SID
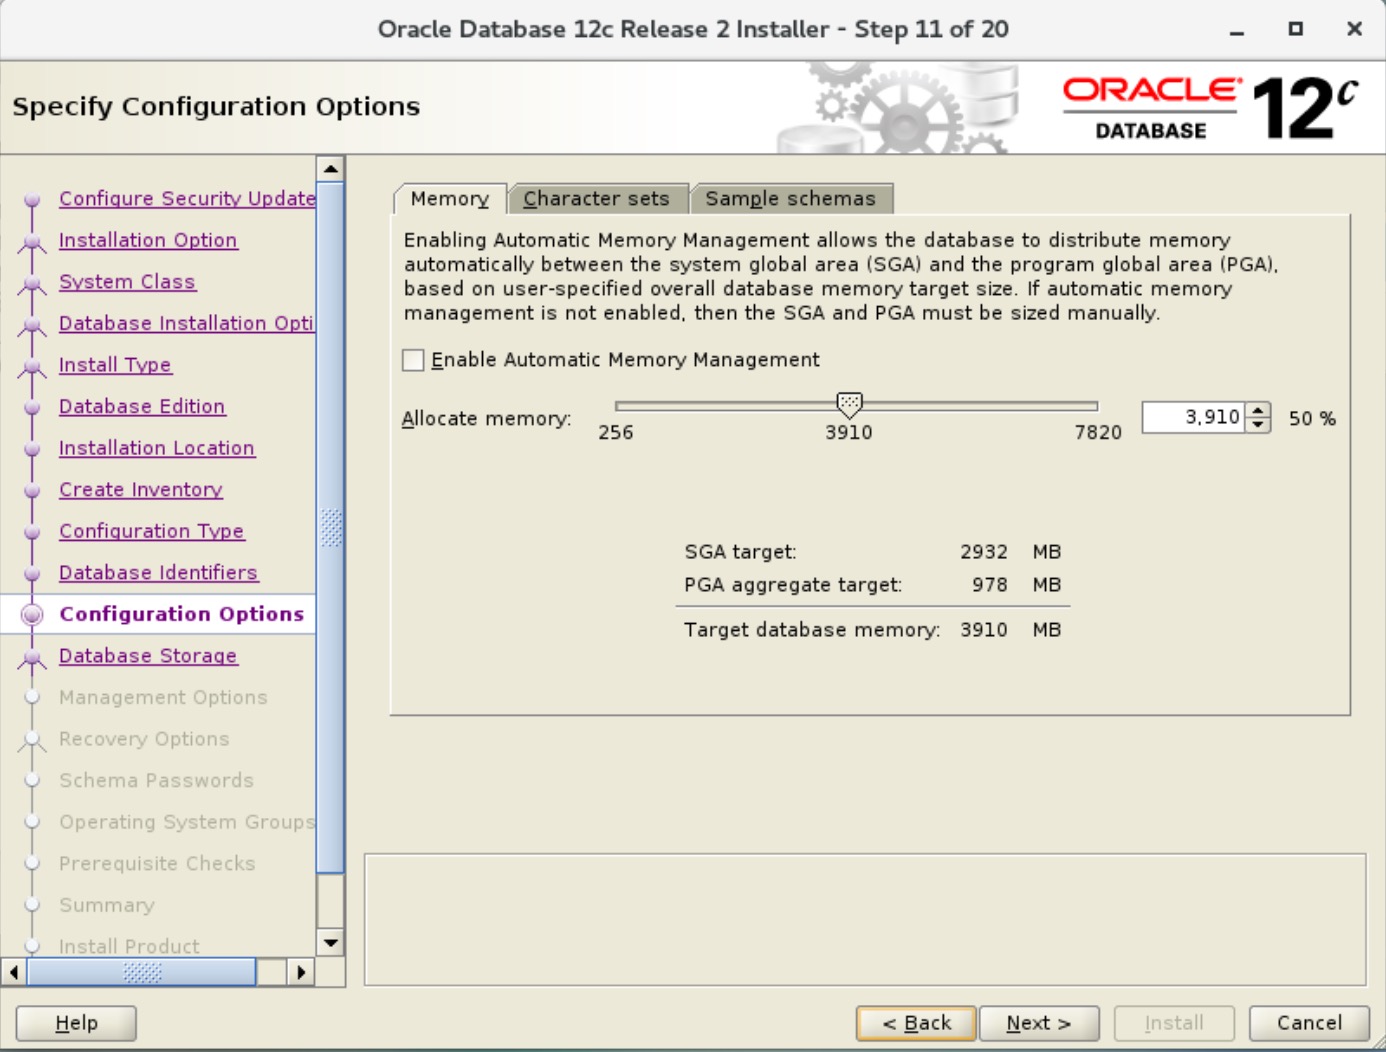
- 配置内存和字符集
默认就好了
Memory: 内存大于 4G,没法勾选自动管理
字符集默认的 Unicode (AL32UTF8)
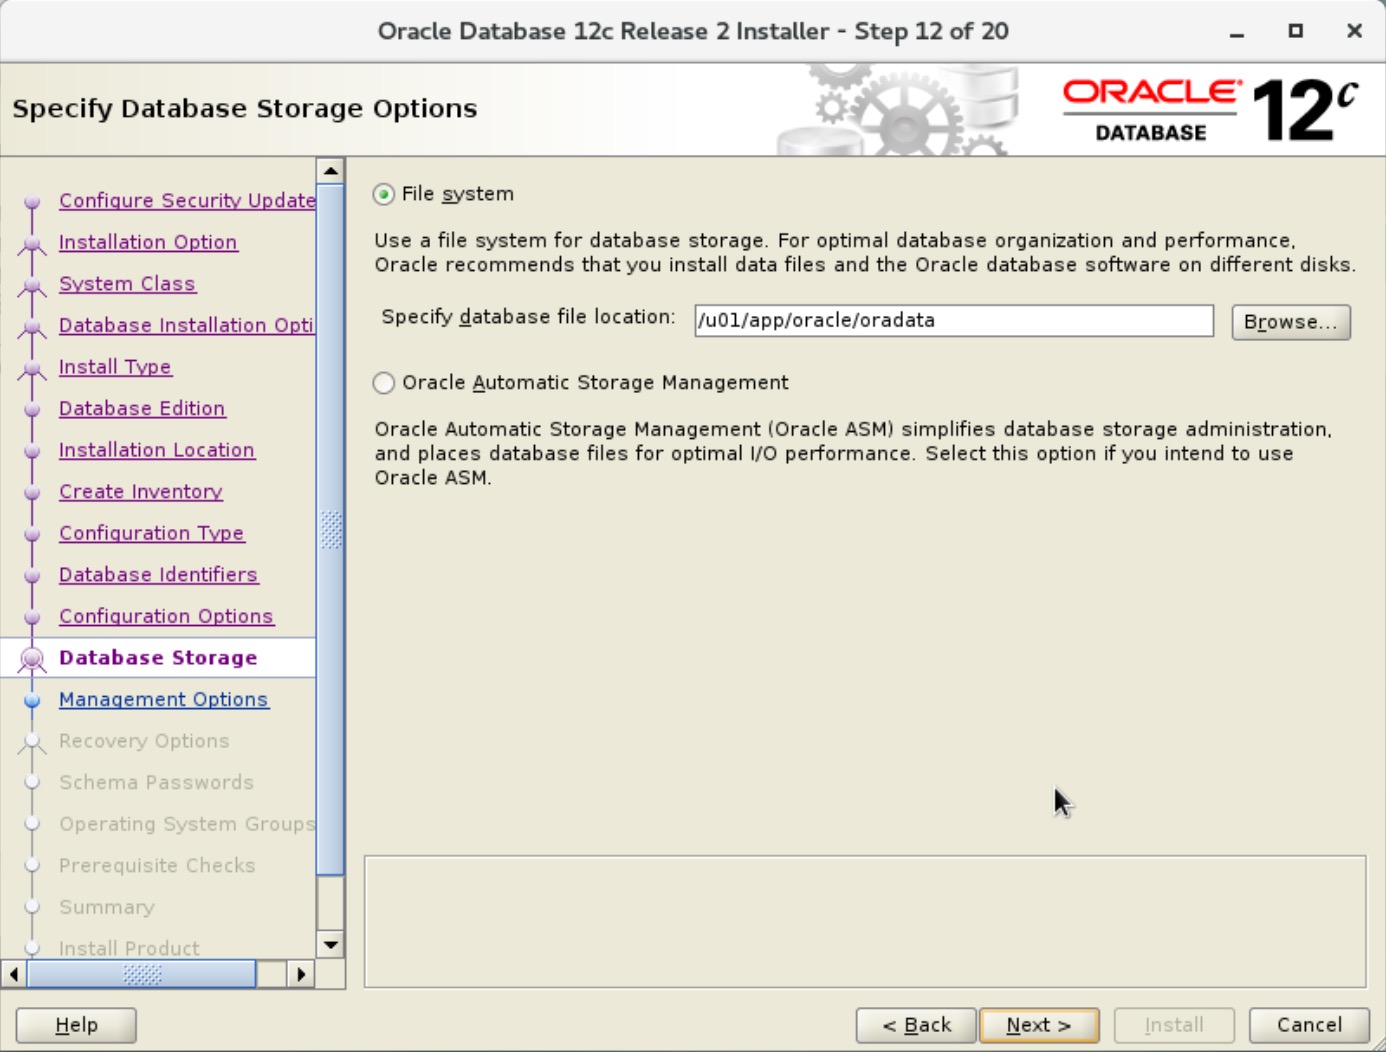
- 数据库的存储目录
Specify database file location: /u01/app/oracle/oradata
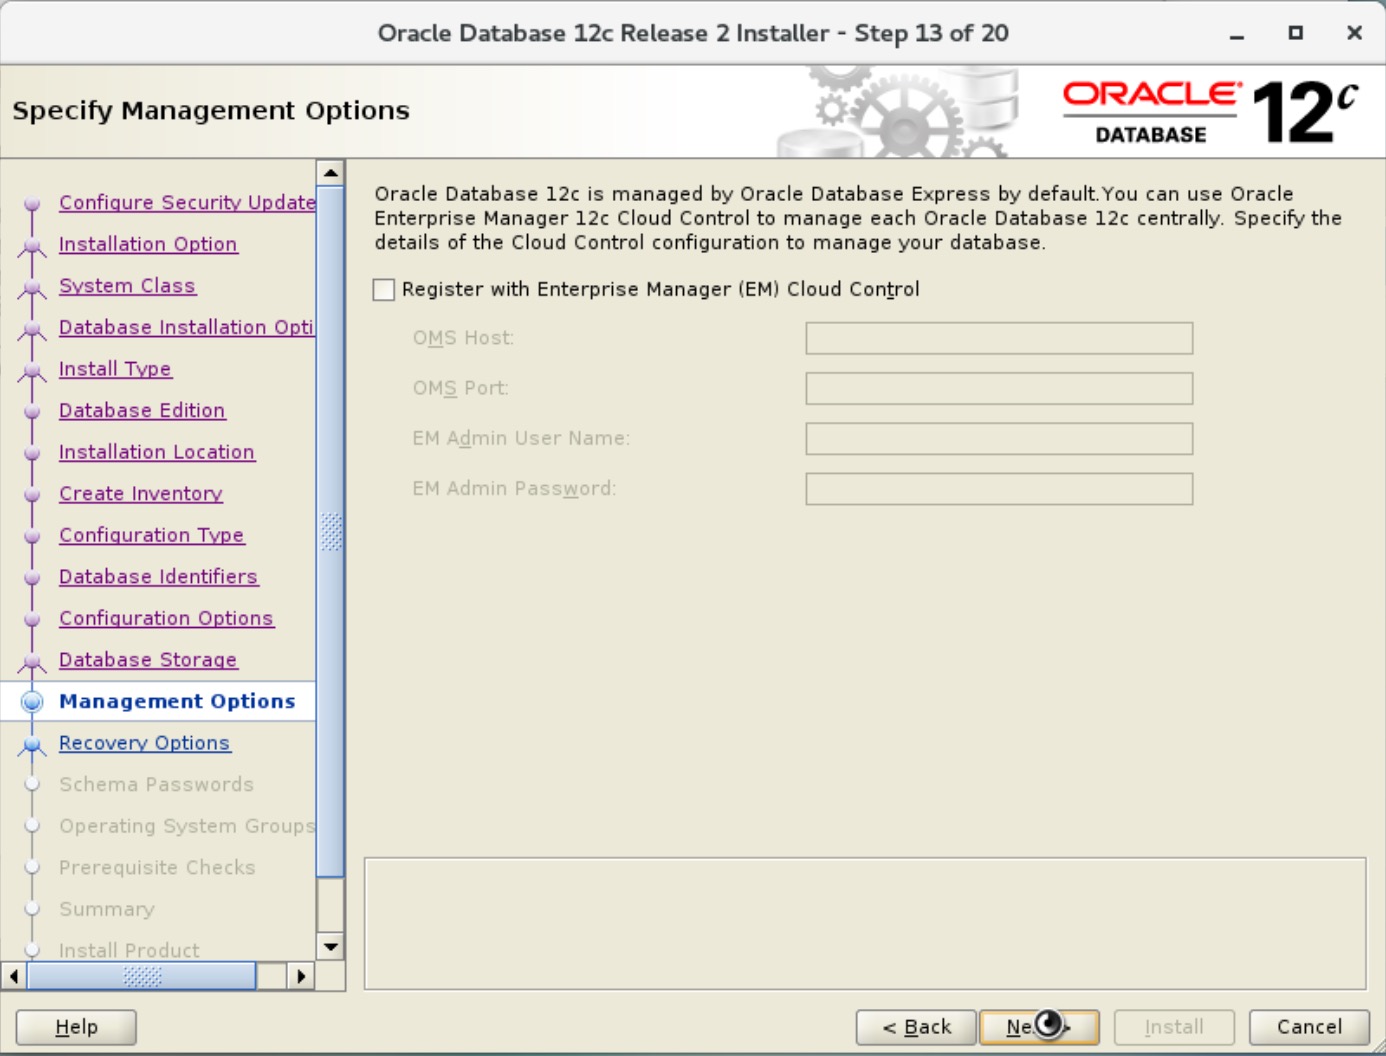
- 跳过,下一步
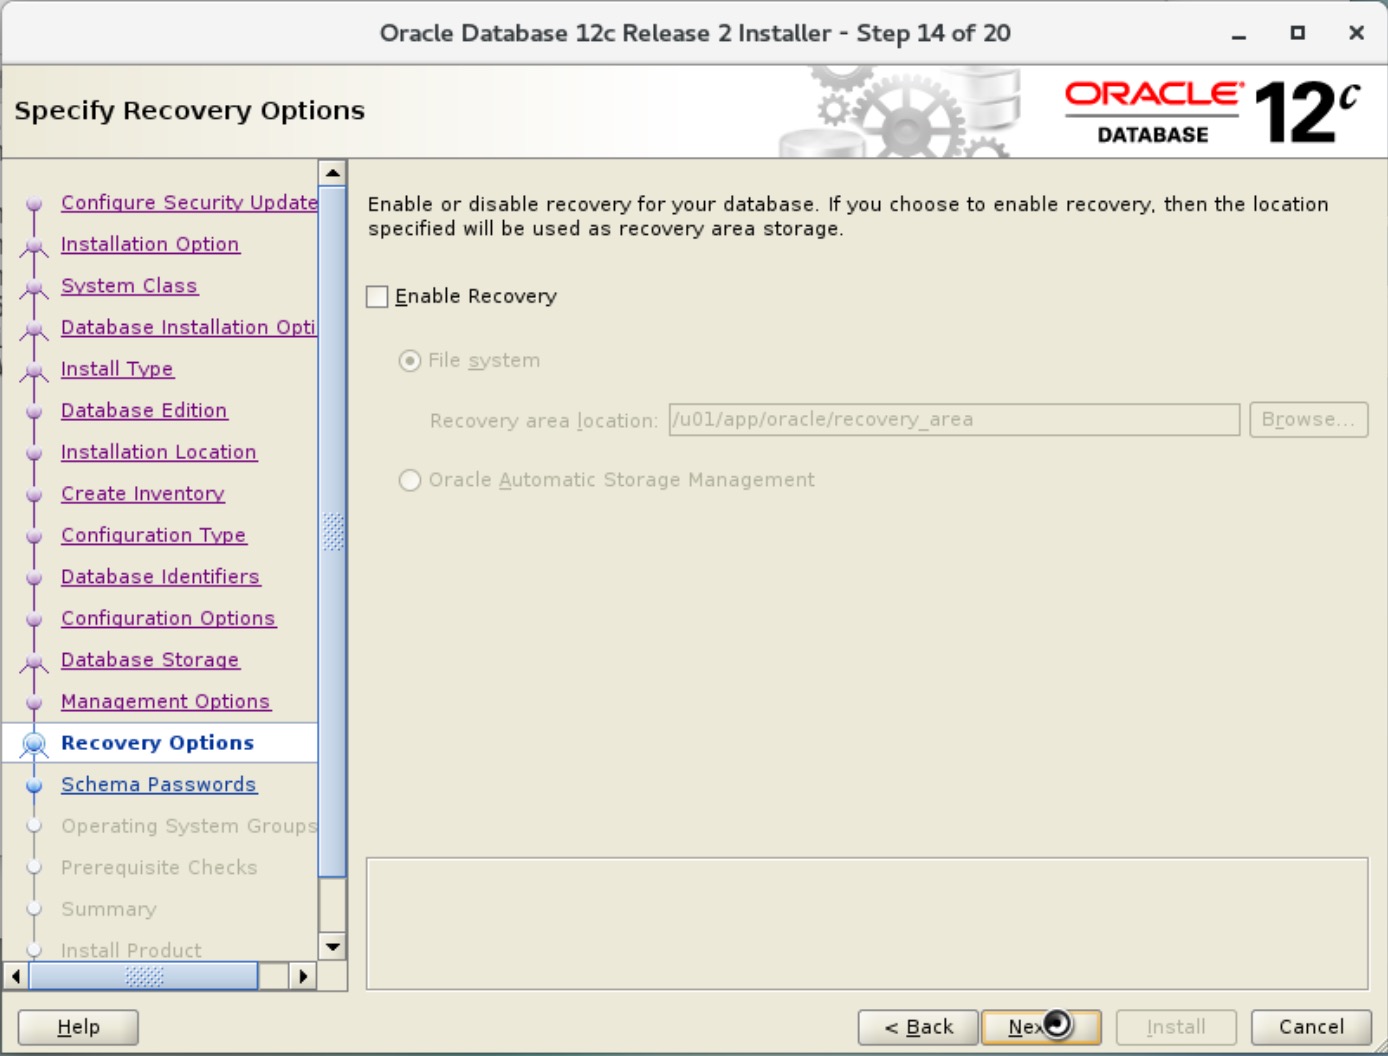
- 不配置自动备份
备份当然重要,但是最好在安装完成后再配置
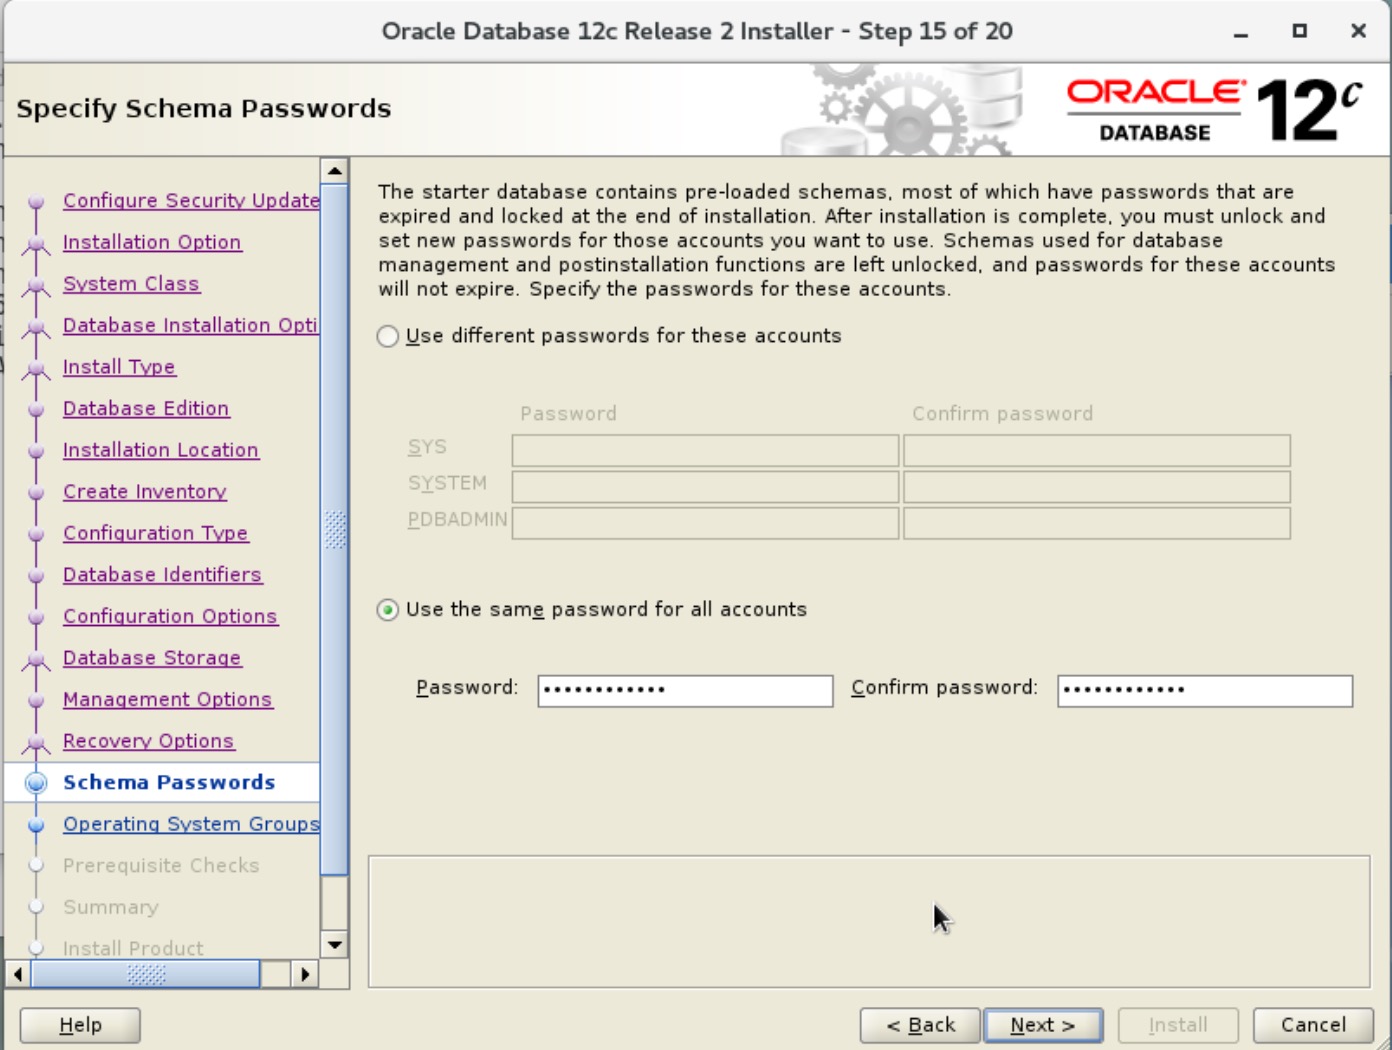
- 配置管理账号密码
为了省事,所有账号使用一个密码
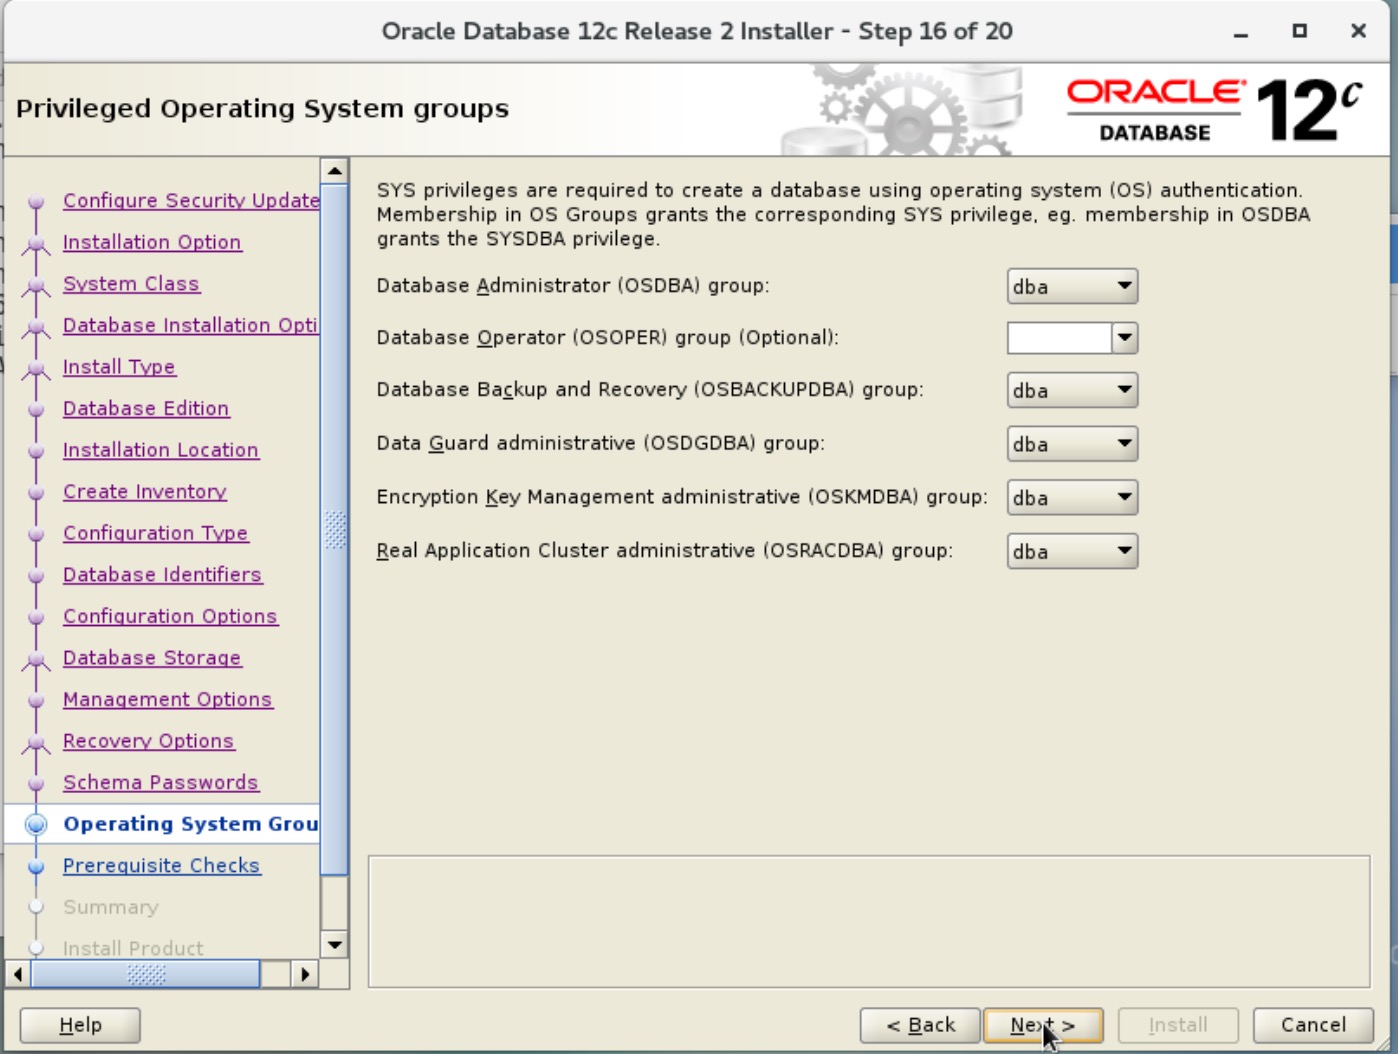
- 配置操作系统的权限组
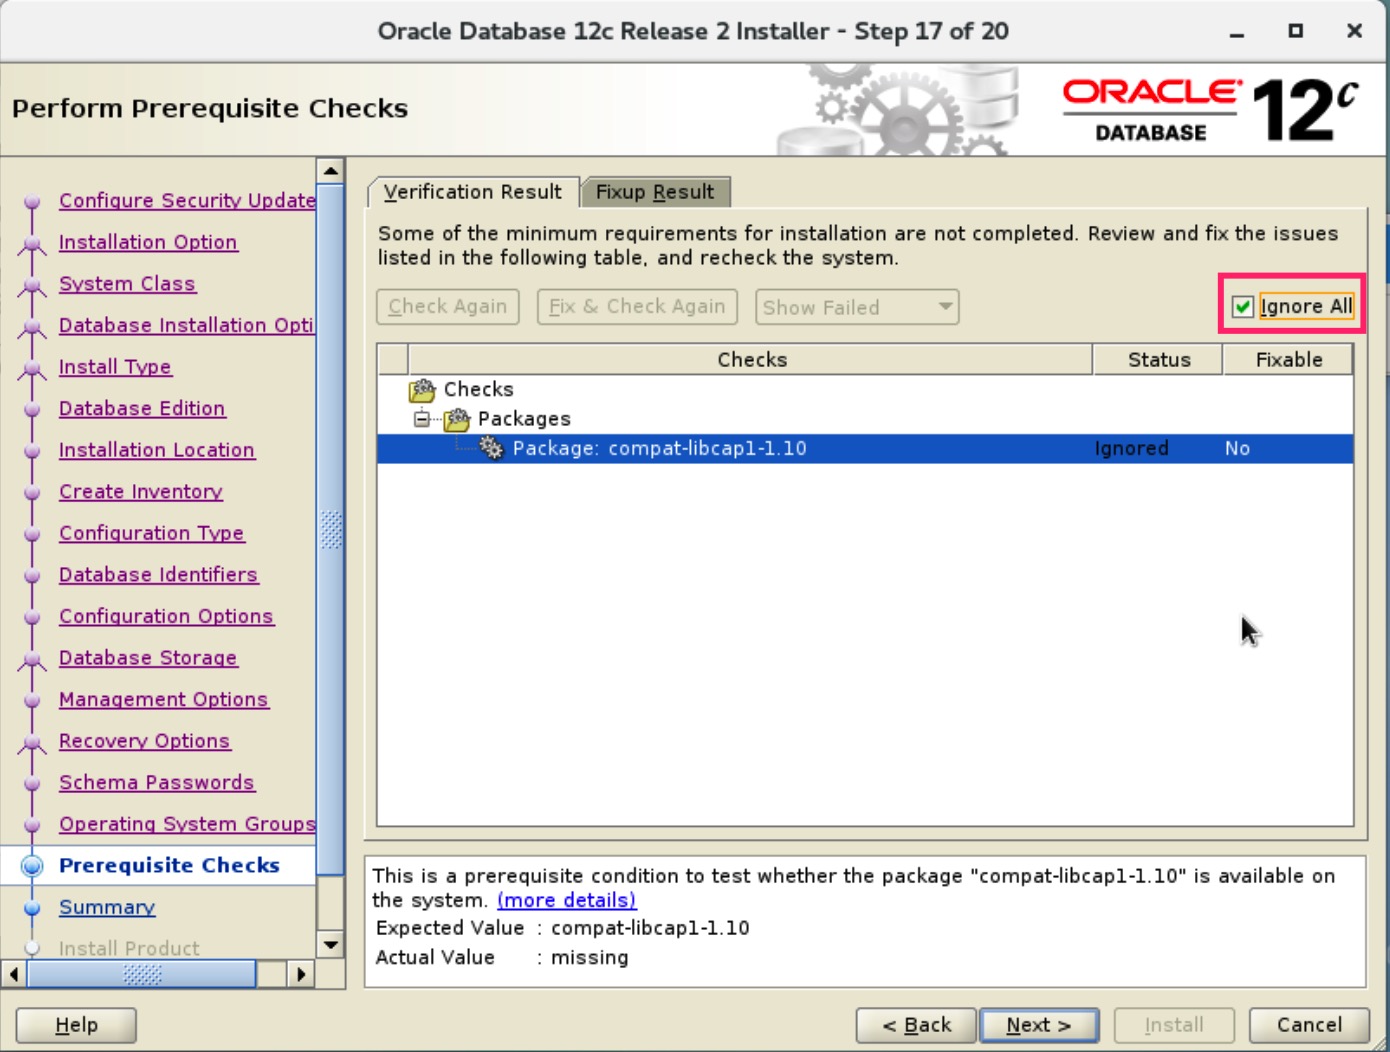
- 检查依赖
这个check 有点不准确,如果按照我给的依赖安装的话,这里的框里应该是空的,点击下一步

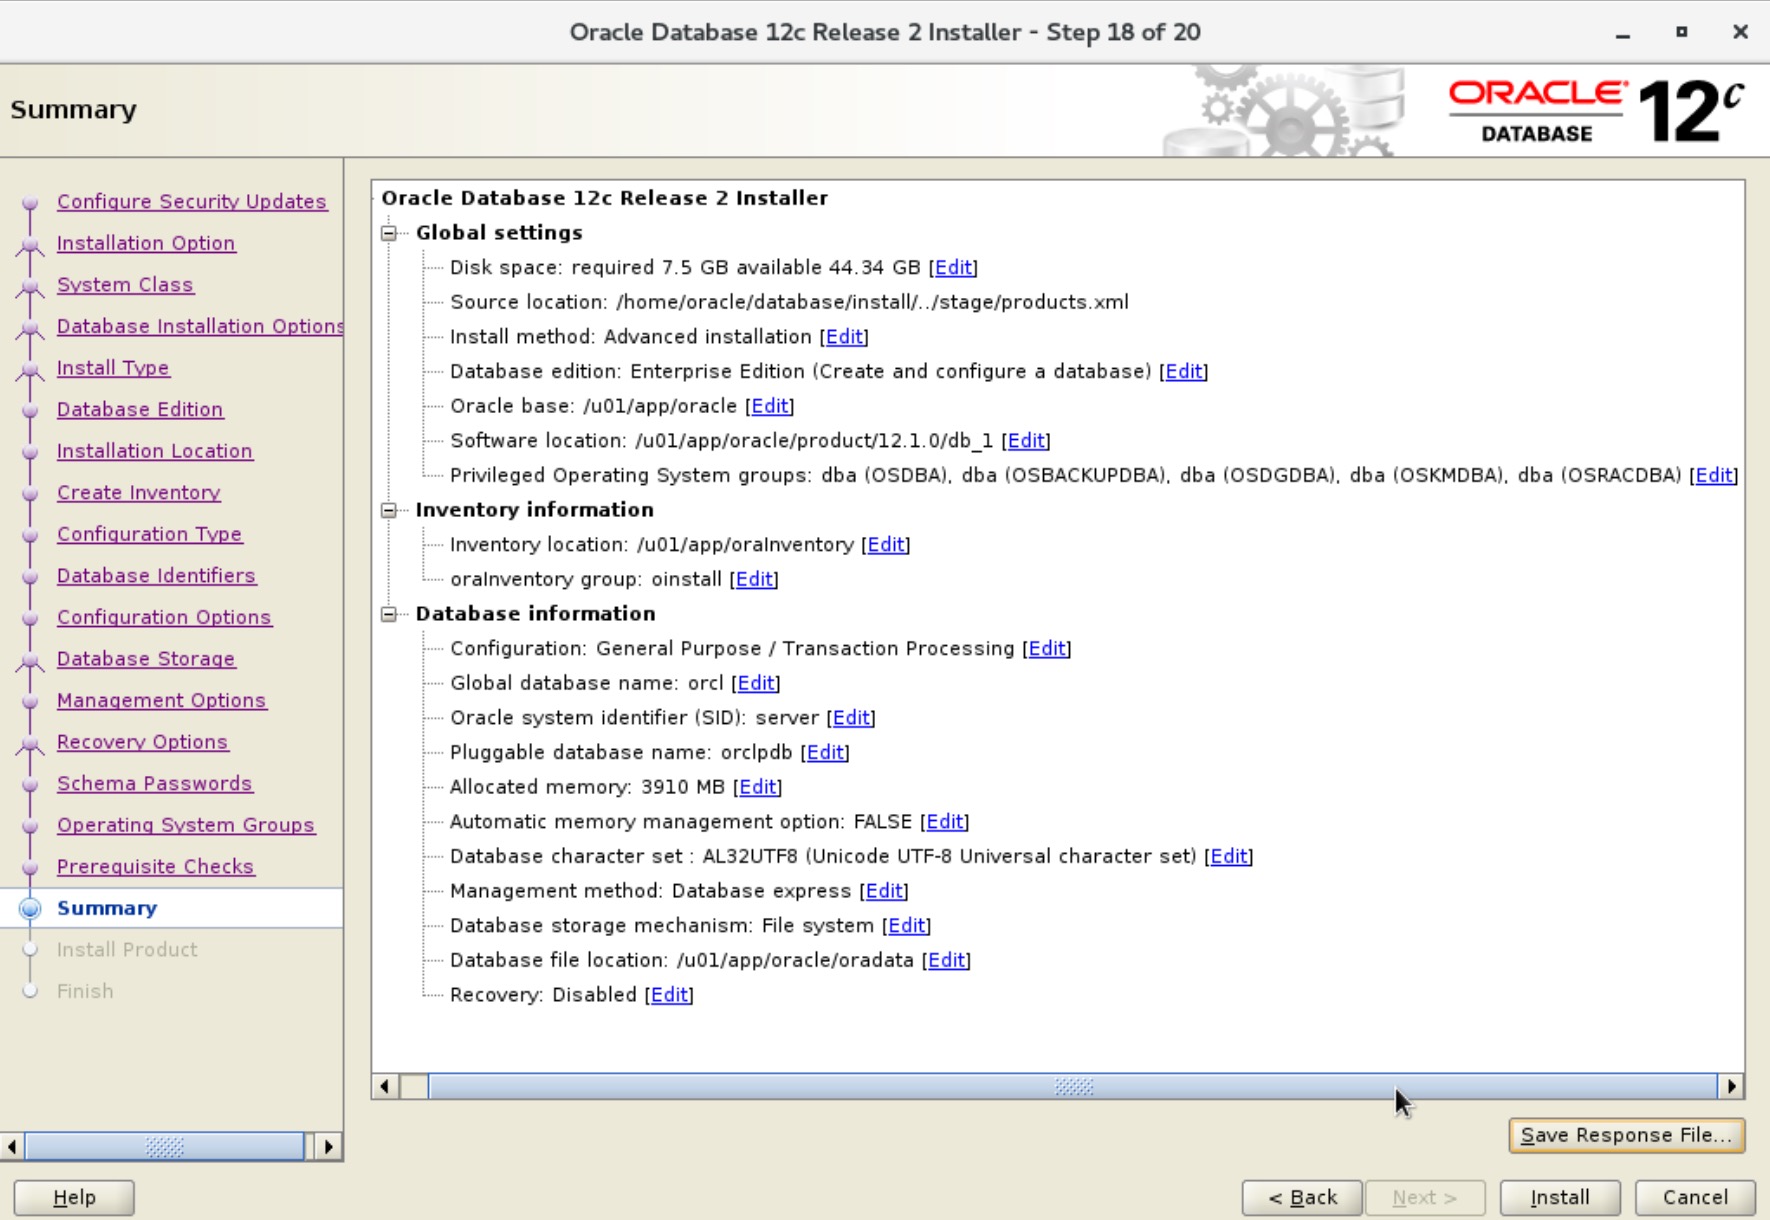
- 确认安装配置
右下角,save response file,这里可以导出到文件,以后用于非交互式安装,也就是命令行下的安装,无需图形化。
- 然后就开始安装啦,实测不会有报错了,但是 79% 时,会让你用 root 用户运行两个脚本
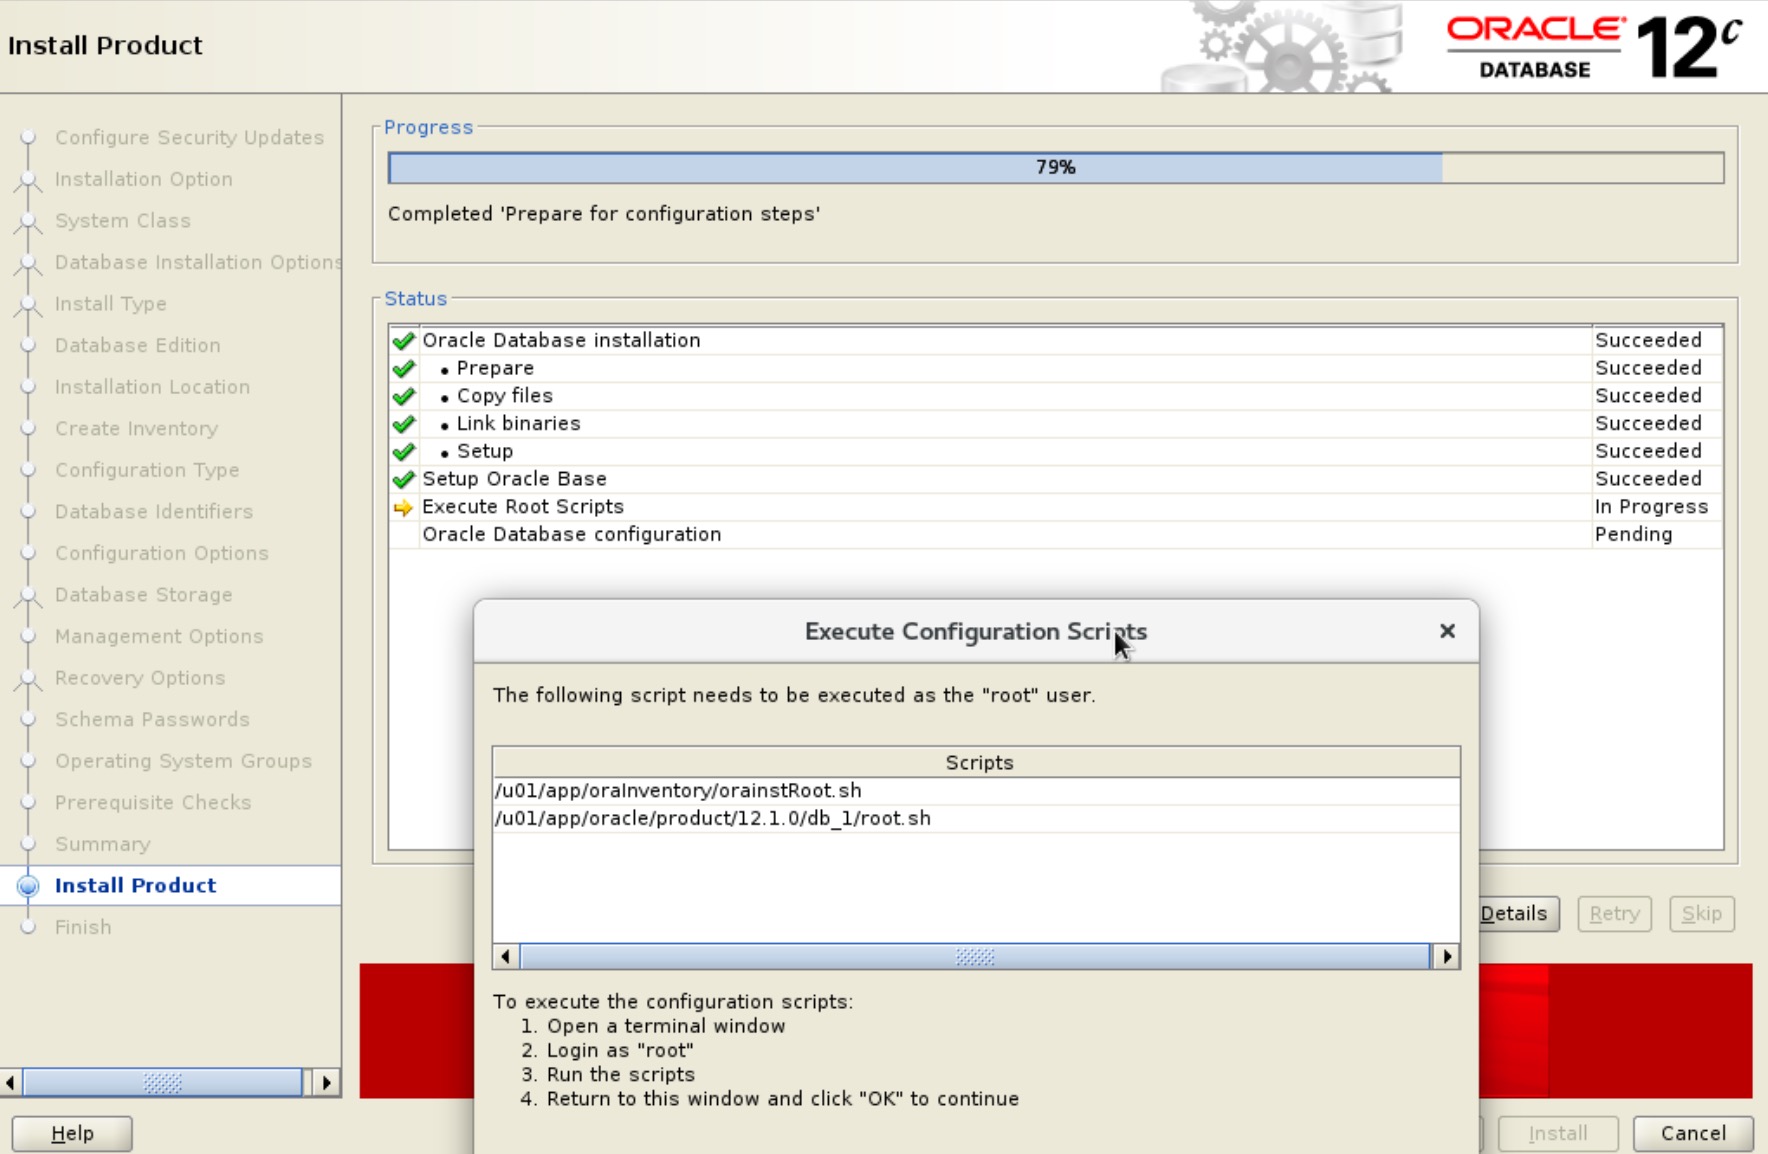
1 | [root@Oracle ~]# bash /u01/app/oraInventory/orainstRoot.sh |
1 | [root@Oracle ~]# bash /u01/app/oracle/product/12.1.0/db_1/root.sh |
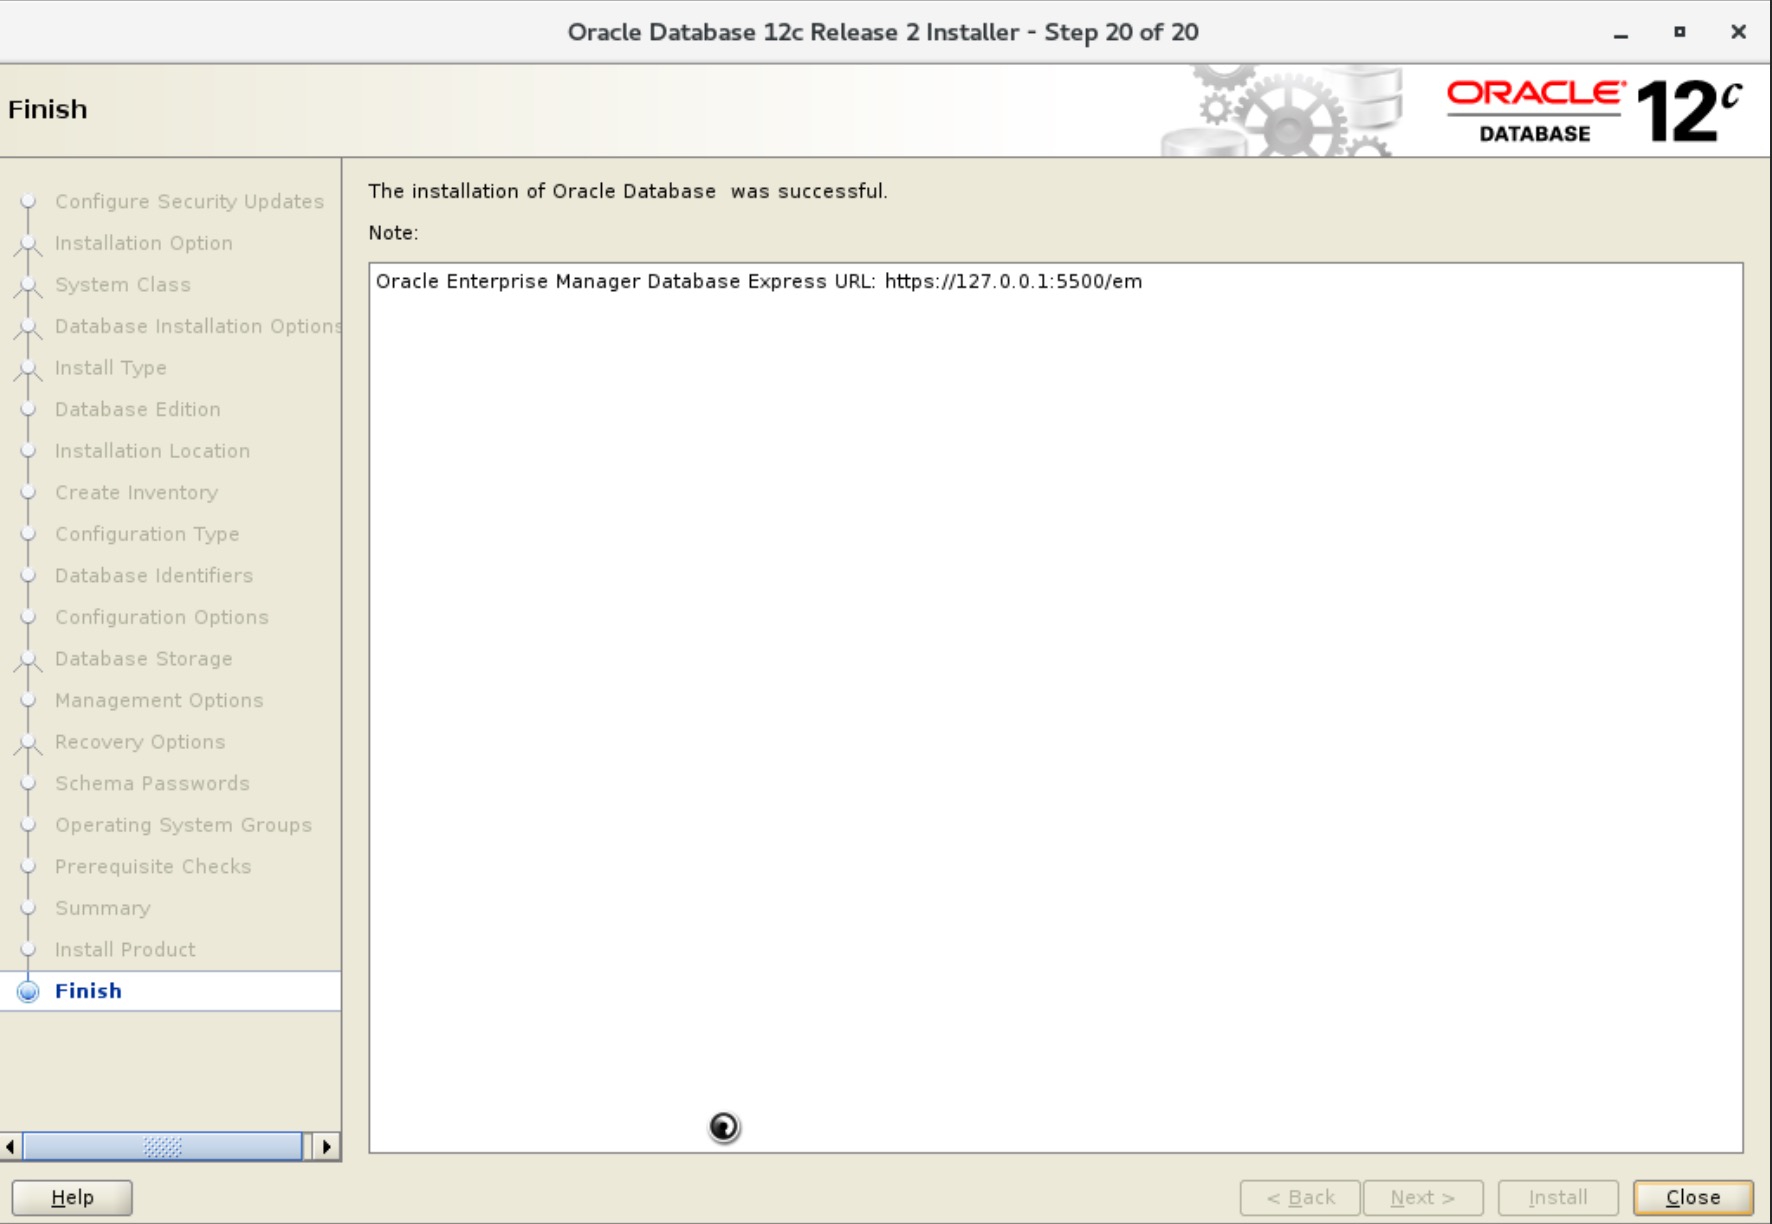
- 这样就算安装好了
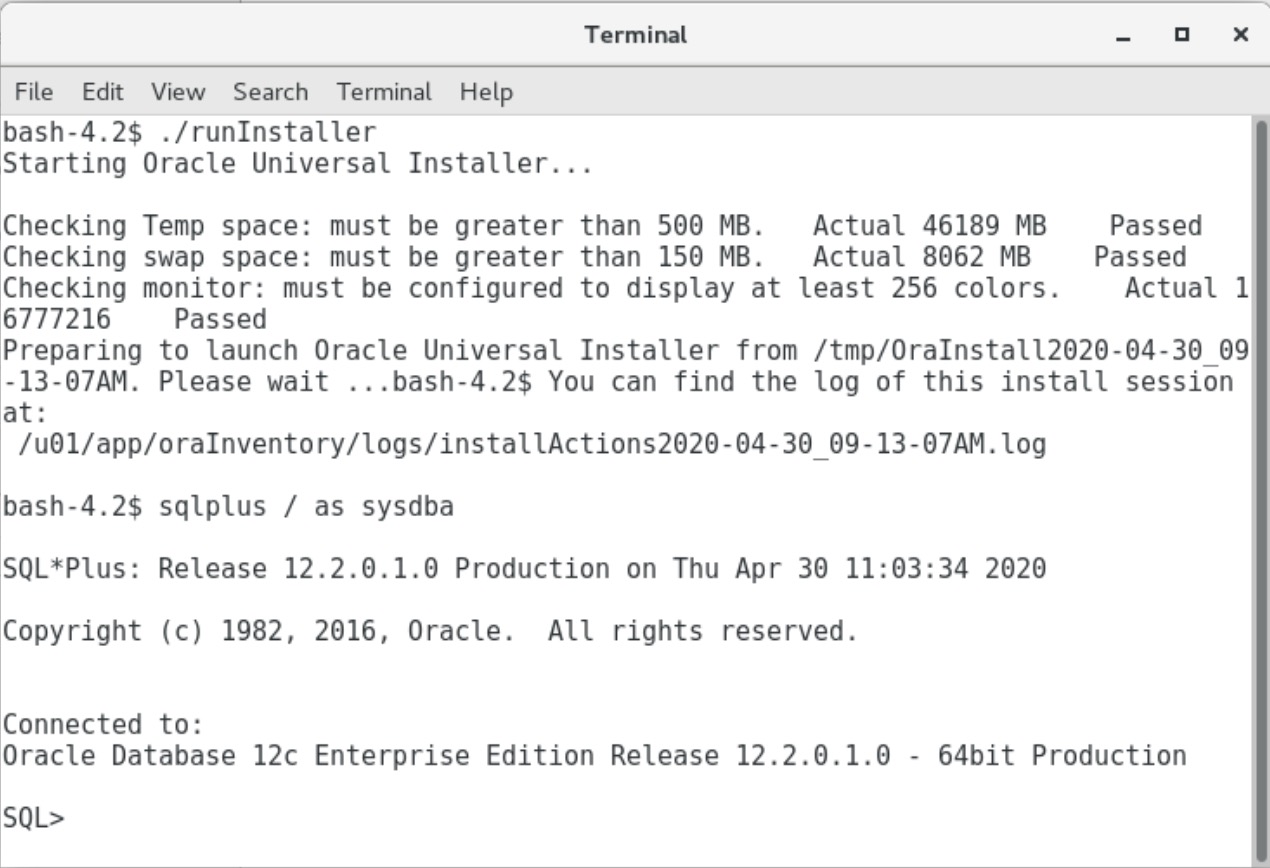
- 使用 sqlplus 进入数据库
sqlplus / as sysdba
后续配置
配置 oracle 开机自启
这部分可以参考 在azure vm上创建 oracle db 那篇,这里就不 copy 了(呲牙)
一些有用的命令
注意:在 oracle 账号下使用这些命令
启动数据库:1
$ORACLE_HOME/bin/dbstart $ORACLE_HOME
停止数据库:1
$ORACLE_HOME/bin/dbshut $ORACLE_HOME
开启 Database Control Enterprise Manager 工具,工具提供了网页来进行数据库控制:1
emctl start dbconsole
停止 Database Control Manager 工具:1
emctl stop dbconsole
检查 Database Control Manager 工具的运行状态:1
emctl status dbconsole
开启监听器(listener):1
$ORACLE_HOME/bin/lsnrctl start
停止监听器(listener):1
$ORACLE_HOME/bin/lsnrctl stop
检查监听器(listener)的运行状态:1
$ORACLE_HOME/bin/lsnrctl status
开启 Database Configuration Assistant 助手 (在图形化的 shell 中,而不是 SSH 的 shell ):1
dbca
Oracle 监听器配置文件:1
vim $ORACLE_HOME/network/admin/listener.ora
在控制台连接数据库:1
sqlplus / as sysdba;
排错
- Message 1070 not found
完整报错1
Message 1070 not found; No message file for product=network, facility=TNSTNS-12545: Message 12545 not found; No message file for product=network, facility=TNS
原因:ORACLE_HOME,ORACLE_BASE,ORACLE_SID环境变量缺失
解决:环境变量要和安装时配置的一样,然后重启监听器
1 | bash-4.2$ /u01/app/oracle/product/12.1.0/db_1/bin/lsnrctl start LISTENER |
使用 sqlplus 连接数据库
1 | bash-4.2$ sqlplus / as sysdba |
- ORA-12514: TNS:listener does not currently know of service requested in connect descriptor
使用 navicat 连接时,提示1
ORA-12514: TNS:listener does not currently know of service requested in connect descriptor
原因:navicat 的连接配置,服务名是 ORCL,服务器配置的是 orcl,而 Linux 对大小写敏感
解决:将配置中的服务名改为小写的 orcl
导入 dmp 备份
1 | -- 导入时必须先创建文件夹路径 |
impdp scott/tiger schemas=certification directory=dp_dir dumpfile=test.dmp
impdp 用户名/密码 schemas=要导入的用户(即是使用expdp导出的用户) directory=创建的文件夹名称(directory_name) dumpfile=test.dmp(要放入到directory路径下) logfile=imp.log(可以不写)
附录:在 Ubuntu 18.04 LTS 安装 Oracle Database 11g 的死亡记录
大概在安装到 68% 时报错了
查看 日志
tail -n 100 /u01/app/oraInventory/logs1
2
3
4
5
6
7
8
9
10
11
12
13
14
15
16
17
18
19
20INFO: collect2: error: ld returned 1 exit status
INFO: /bin/chmod: cannot access '/u01/app/oracle/product/11.2.0/dbhome_1/precomp/lib/proc'
INFO: : No such file or directory
INFO: make[1]: *** [/u01/app/oracle/product/11.2.0/dbhome_1/precomp/lib/proc] Error 1
INFO: /u01/app/oracle/product/11.2.0/dbhome_1/precomp/lib/ins_precomp.mk:118: recipe for target '/u01/app/oracle/product/11.2.0/dbhome_1/precomp/lib/proc' failed
make[1]: Leaving directory '/u01/app/oracle/product/11.2.0/dbhome_1/precomp/lib'
INFO: /u01/app/oracle/product/11.2.0/dbhome_1/precomp/lib/ins_precomp.mk:28: recipe for target 'proc' failed
INFO: make: *** [proc] Error 2
INFO: End output from spawned process.
INFO: ----------------------------------
INFO: Exception thrown from action: make
Exception Name: MakefileException
Exception String: Error in invoking target 'links proc gen_pcscfg' of makefile '/u01/app/oracle/product/11.2.0/dbhome_1/precomp/lib/ins_precomp.mk'. See '/u01/app/oraInventory/logs/installActions2020-04-26_06-28-09AM.log' for details.
Exception Severity: 1
因为看到1
INFO: : No such file or directory
尝试自行创建目录1
mkdir /u01/app/oracle/product/11.2.0/dbhome_1/precomp/lib/proc
继续报错1
INFO: STRING.0.0' can not be used when making a PIE object; recompile with -fPIC